Mike's '92 ST185 Teal in New York (Daily Driving It)

RedCelicaTRD

Moderator
I wish I had a tire shop in my area that could get my settings that close. They seem to think -.05 toe on one side and +.1 toe on the other side is just fine (just an example, can't remember my real specs but they sure aren't even side to side). And then they look at me funny when I say it still doesn't drive straight :pissed:
 

mike325ci

New member
Thanks!

The guy who did my alignment is a friend of mine (also MR2 owner) who autox's and tracks his car, so he understands that getting your desired alignment specs is important. Yeah, he was very thorough and I was very pleased... :)

Oh, the rear Rallyarmor mudflaps: I removed them because 1) I wanted to rust-proof coat the holes that I drilled, and 2) with my larger wheel/tire diameter, they rub against the tire, so I need to figure out a way to pull them back away from the tire more. (had no issues with my stock wheels/tire size before)

Pedal feel and initial bite are the major gripes I have with the brakes. The car stops fairly fine on the street (no, "OMG I'm gonna hit the car in front of me," but then again, it's not "OMG my eyes are gonna pop out their sockets" either (which is what braking in my Lotus is like lol)). I'll drive around a bit more to see what happens and how my feelings change about it...

I realized, ever since I got the car, I had driven only a total of 1700 miles (70,190~71,866mi) over 4.5 years (7/2005~now). LOL.
 

mike325ci

New member
1/24/2010 Update - Heater Core bye-bye

I drove another 100+ miles on Sunday to meet up with Cory out in LI. Finally got to see his pristine '92 ST185... :)

Anyways, on the way there, I noticed about 50 minutes of driving on the highway my windshield started to fog up and it smelled like coolant inside the car.

Well, it got a lot worse driving back, and I noticed some drops of coolant in the passenger footwell. Darn! (On my newly replaced carpet too, bummer-- I will probably take it out and shampoo it.) And then towards the end, damn coolant was just reeking out of the vents, even with my climate control vent setting set to re-circ. It got so bad that I had the passenger window down and the sunroof open so that the coolant would fly out that side and not towards me; while wiping down the window driving, lol... My hair and my car interior smells coolant sweet and lovely. ><

18733_681054374412_120852_39095910_1215422_n.jpg

18733_681179628402_120852_39101033_3760459_n.jpg


Anyways, so I need a heater core if anyone has one... else I'll have to just get it redone at a radiator shop or something. Meanwhile, anyone know what diamter of piping I should use to temporarily bypass the heater core? I will need to do that before my road trip down to Philly, PA (and Trenton, NJ) this weekend. Cos I don't have time to put away a full day to take apart the dash and get the heater core / assembly out... ><

Fun, fun. Seriously, this never stops, hahaha.

-- Well, at least the car drives beautifully. Redlines smoothly, handles in the twisties well, and rides very well (I set my shocks at full soft and it's much more livable than at full stiff. I love Koni Yellows-- they are really high quality stuff for a street-driven car...). I am happy with my exhaust; it's just the right sound characteristic that I was looking for: Exhaust note is almost inaudible at idle and cruise, but really opens up when you go past 4500rpm or so.
 

mike325ci

New member
CMS-GT4":i4ox9adz said:
What can kill a heater core? Rust? Age?

I'll find out exactly what happened once I dig in there to replace it... It was catastrophic and sudden: Now that I think about it, the heater always worked REALLY well in the car (was piping hot) ever since I got the car. Maybe it's one of those things that really work well just when it's about to die, lol.

Anyways, I got a replacement heater core from Tim today so it's just a matter of finding a free full day on a weekend to take apart the dash and have some fun...not! :twisted: ... Might be in 2 or 3 weeks.

In the meantime, I'm going to bypassing the heater core this Saturday, then drive down to Trenton to get my midpipe replaced and fitted. Also, I'm driving down to Philadephia for the autocross this Sunday. So no time this weekend for car work. Next weekend I have a friend coming into town, so no car time...

Also, my windshield wiper pump or nozzle isn't working. I forgot to mention that. I need to figure that out too... Even these little things / maintenance will be enough to keep me busy lol... Damn old cars. Love them and hate them.
 

mike325ci

New member
1/30/2010 Dash Removal

I did about 6 hours of work today. All I could accomplish was the removal of the dash (+ steering wheel & center console)... I couldn't figure out how to remove the heater core (I couldn't find any info in my BGB -- heater core doesn't fall under "Cooling" or "Air Conditioning," but it looks to me like I have to remove the A/C condenser box, and then slide the heater core box out.) I can see the top of the heater core right now, taunting me... It was like 16 degrees out, and even in my garage it was freezing, so I had to take some "thawing" breaks in between...

(My plans for the autocross and midpipe install has been postponed for now.)

18733_681179633392_120852_39101034_3728010_n.jpg


Additional photos of the tear-down is here:
http://picasaweb.google.com/mikechoi210 ... 7340991362
 

DudeMan

New member
Oh my god that doesn't look fun.

Its funny, I have my whole engine, drivetrain and most of the interior stripped from my car right now but the thought of taking off the dash still scares me.

There's so much going on in there.
 

CMS-GT4

Active member
I hate removing the interior from these cars. That is why I have been waiting for the whole thing to be done before I put it back in. I plan on never taking the interior out again if I can help it.
 

darthripley

Moderator
CMS-GT4":dqbnmqxj said:
I hate removing the interior from these cars. That is why I have been waiting for the whole thing to be done before I put it back in. I plan on never taking the interior out again if I can help it.

+1

so sorry your heater core died Mike - that just looks like a complete nightmare to replace. :|
 

mike325ci

New member
2/13~14/2010 Update

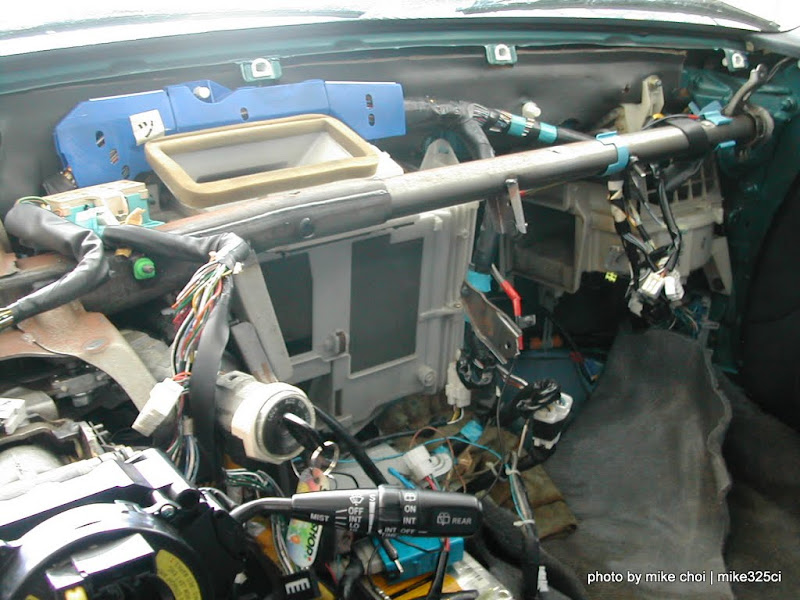
Heater core is a nightmare... I am not sure how much more I have to remove to be able to remove the heater core box, but I guess I didn't do enough... Looks like the metal cross bar has to come out... Plus I couldn't get the inlet heater hose disconnected at the firewall. The outlet hose was a 45 minute cursing job as well (had to remove a bunch of stuff out of the way to make room for me to get to the hose clamp and pull it out). I was so discouraged that I decided to take care of other things; so overall this weekend I did:

1) A little bit more heater core work: Got A/C unit out and not much else, really :(

How much more do I have to take out to get this sucker out??!@#!% :x :cry: :shoots: :( :bangshead:
IMG.2010.02.14.30.jpg


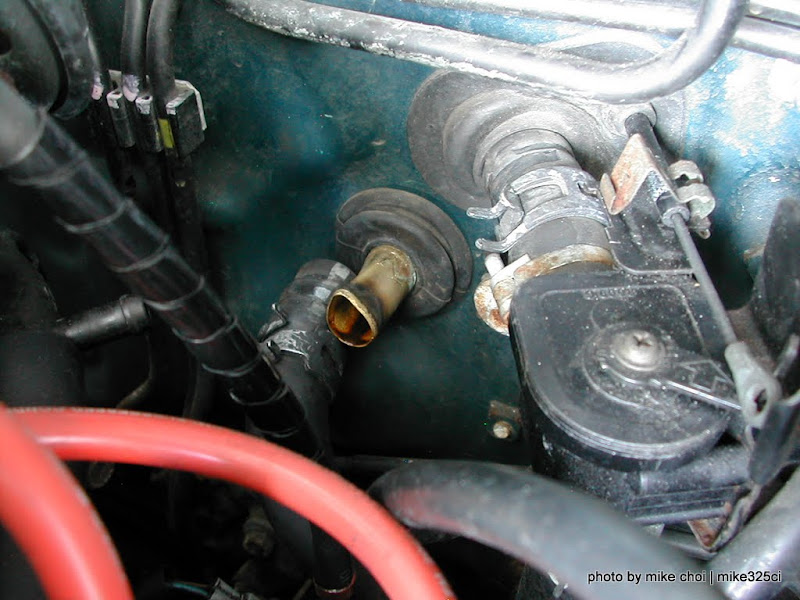
COOLANT LINES IN FIREWALL. Only managed to remove the outlet one... :(
IMG.2010.02.14.45.jpg


2) Drained coolant from radiator. Not much came out; maybe a gallon? The rest puked itself into the car cabin, I suppose. It was also nasty dark red and thick. I don't know why I didn't do a full coolant flush when I got the car-- but I definitely will be doing it now!!!!

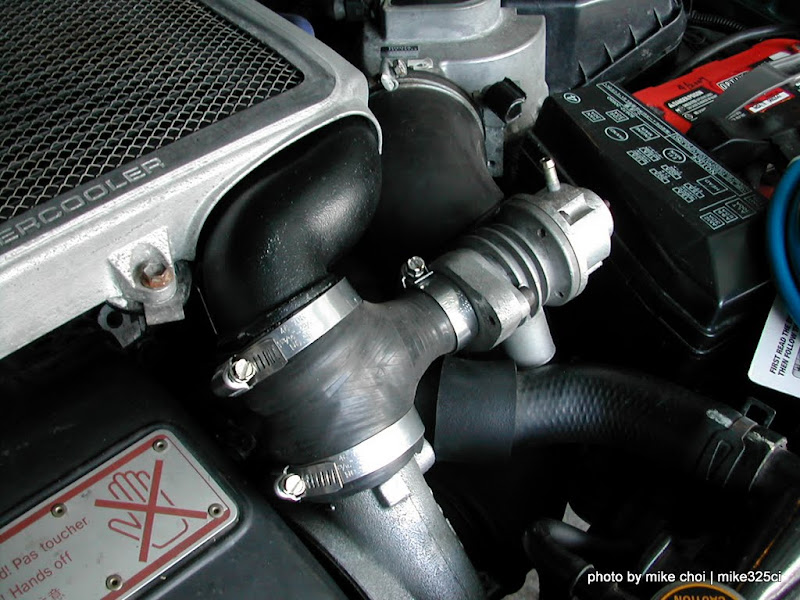
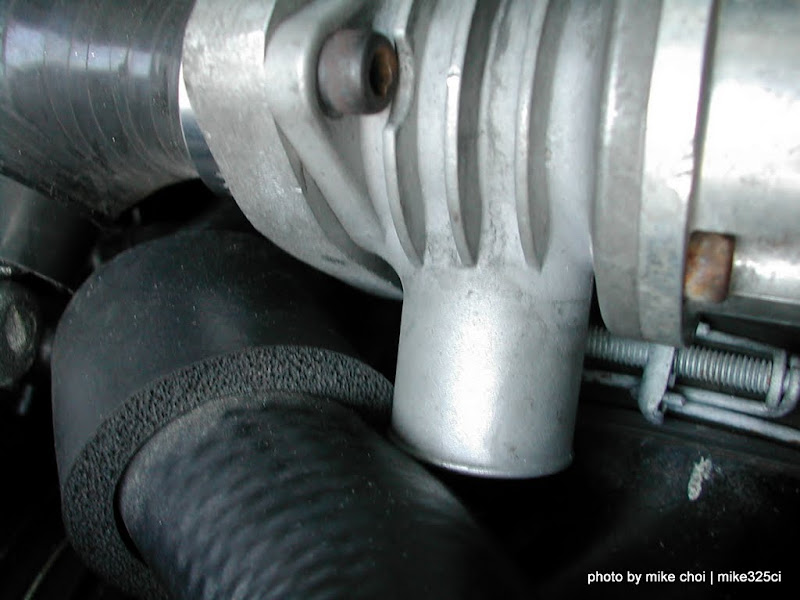
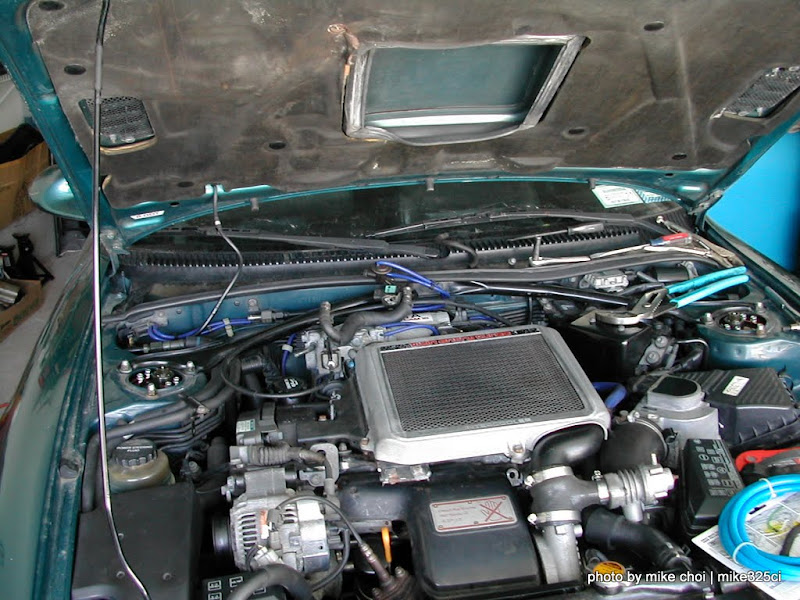
3) Installed ARC BOV: Tried using my high-quality HoseTechniques clamps, but they were too thick, so went back to traditional worm clamps. The outlet of the BOV hits the radiator hose, but hopefully that's fine.

IMG.2010.02.14.42.jpg


RADIATOR UPPER HOSE & BOV OUTLET:
IMG.2010.02.14.43.jpg


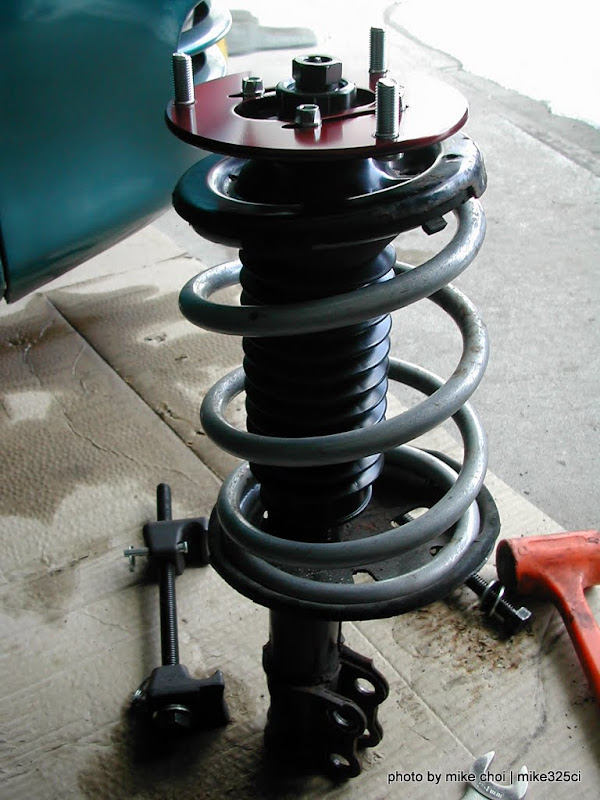
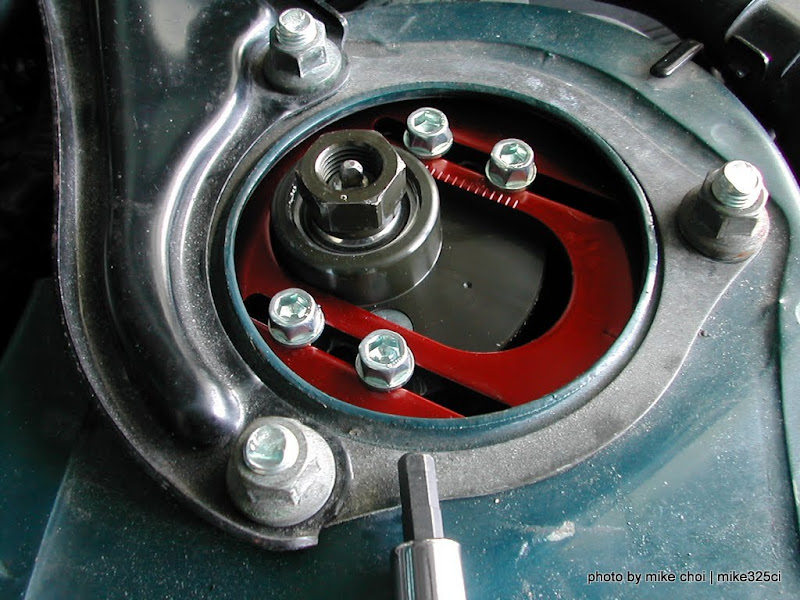
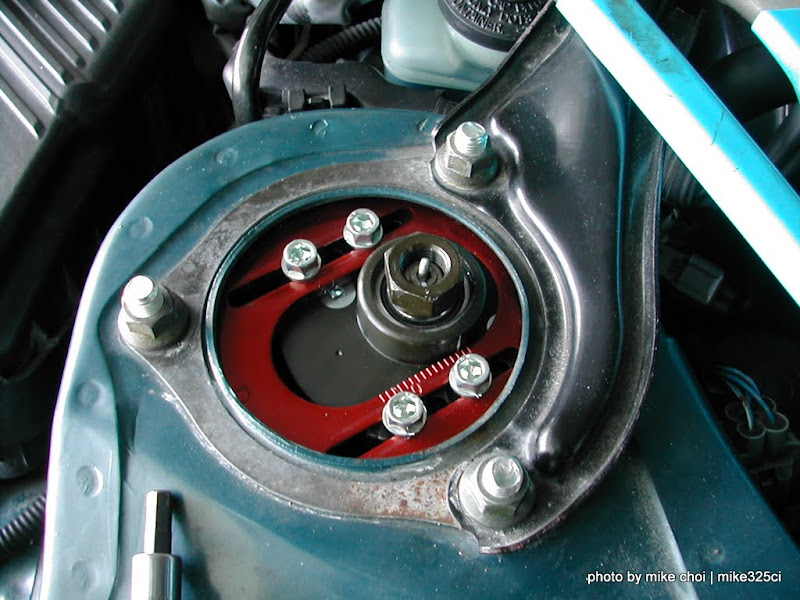
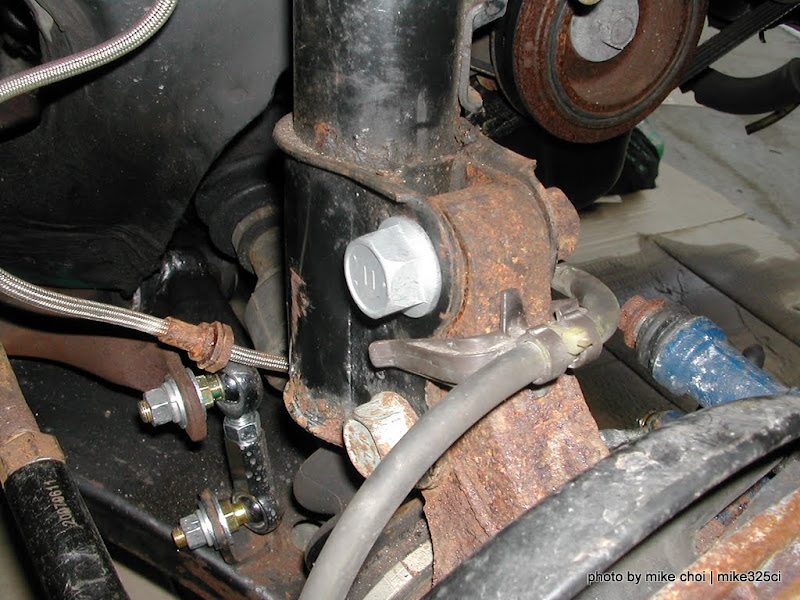
4) Installed my C-One Camber Plates. I shall call them caster plates, because that's what I'm using them for. :) 
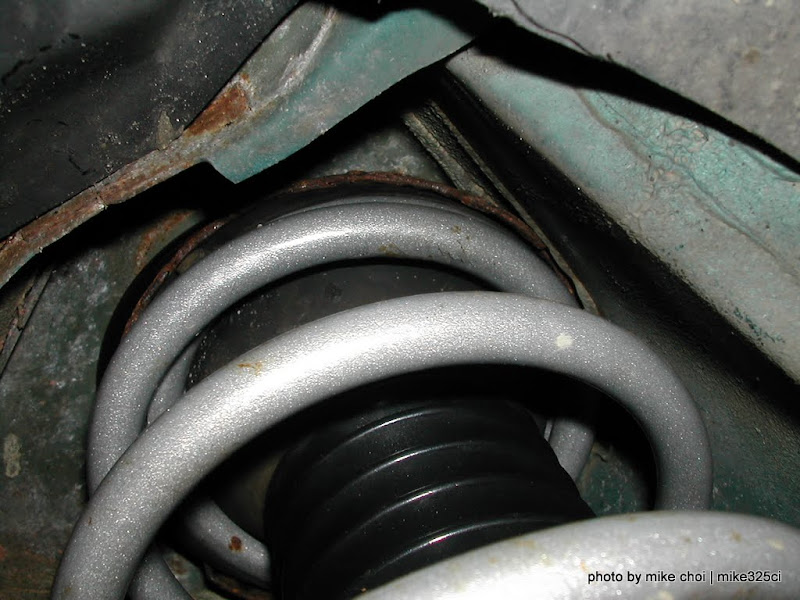
I set them back as far back as I could. Oddly, the left side didn't go back as far as the right (max back), since the top of the spring metal thing was hitting the inside of the car body. I think the metal tab on the bottom of the spring top is rotated towards the back of the car on that side whereas the other side is rotated away from it.
Notes:
A) I had to move the adjusting screw inwards 2 notches to be able to clear.
B) I can't use the Koni adjustment knob, since the nut on the C-One plates are high and cover the sides. I'll have to hack up the knob or find another way to do quick adjustments of my shocks.
C) With the settings the way I have it, the car has A LOT of toe in. It is visibly obvious. I need a realignment, plus I need to find out what my front camber settings are too.

Remember to use the spacer ring that was included with the kit. This gives the plates enough "wiggle" room to rotate. Without it (tried it first like that), it doesn't freely move:
IMG.2010.02.14.05.jpg


ASSEMBLED:
IMG.2010.02.14.08.jpg


RIGHT SIDE:
IMG.2010.02.14.09.jpg


LEFT SIDE:
IMG.2010.02.14.19.jpg


LEFT SIDE hitting the body:
IMG.2010.02.14.21.jpg


ENGINE BAY (BOTH SIDES):
IMG.2010.02.14.29.jpg


5) Installed front crash bolts. Found the right part # for our car (Part #90105-17005), so I'm happy it worked. I got the 3-dot one (most adjustment). [Again, for the rears, SW20 MR2 ones (Part #90105-15006) worked-- the fronts are much thicker in our cars.]

IMG.2010.02.14.12.jpg


6) Rebled the front brakes since I had to remove them in order to take out the coilover housings (why Toyota didn't have a tab that is split so you can just bend it, I dunno...)

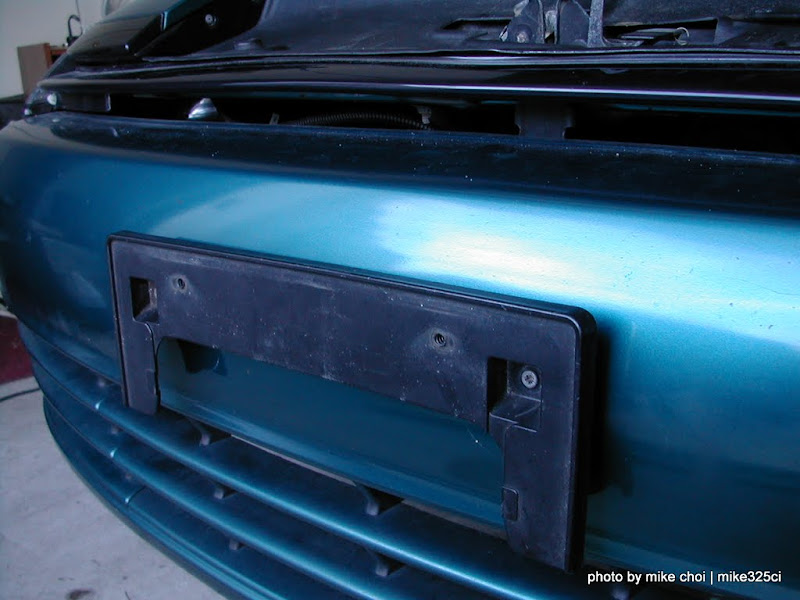
7) Installed front license plate frame holder
IMG.2010.02.14.41.jpg


8.) Tightened power steering belt. 14mm short socket + pry bar was the key.

My CF card died on me again, but I was able to recover some of the images using this utility program that I bought (Zero Assumption Recovery). Seems to happen all too often, so I'm going to see if I can get it replaced under warranty from Kingston. It's about 8-9 years old, lol...

--> All photos from the weekend are here: http://picasaweb.google.com/mikechoi210 ... PlatesBOV#
 

justjoe

New member
Hey Mike.. I really wish that we lived closer, or we would both come over and lend a hand.. especially since you are having to go through soo much grief..
Sorry to hear about the heater core.. I struggled with that hose before.. and cused at it.
Not sure what else would need to come out before the core will come out.. they always seem to have "hidden" bolts.. heck when doing the accelerator pedal, I had to remove it, and before I could do that, I had to take out the EVAC ECU!! what a pain!

I also wanted to comment about the camber plates.. they look AWESOME.. but I am affraid that they are installed incorrectly.. I hate to tell you, but every single camber plate I have ever seen installed is at a right angle to the outside of the car.. hence the name "Camber plate" See these 2 photos that I found on the interwebs..

camber%20plate_Large_.jpg

Deleted the second big image..

OK.. I have not seen those camber plates in person.. but they almost look like they have "R" and "L" printed atop the plates (almost indicating that is "towards outside" kind like on the insulator medal "-> out").. I can almost make them out in the photos.. now here comes the bad news..
Either you might be able to get away with droppin the struts and rotating them.. OR you have the Left on the Right and vice versa..
Again, I am not there... just trying to help remotely. That might help them fit in better also.

Here is another photo from I think an ae86:
DSC02978.jpg


P.S. You can cut the tab on the struts so that you can slide the SS brake lines in and out.. that is what we had to do on Vadar when we installed the GAB's.. hated to have to cut the GAB struts.. but you do what cha gotta do.
 

mike325ci

New member
Hey Joe, thanks for the post and your earnest attempt to "correct" me about my camber plates. Actually, I have installed them "wrong" on purpose...

1) I intentionally rotated them 1/3 turn so that I can adjust the camber AND caster (shock assembly moved towards the rear of the car). Others have done this; see thread here: viewtopic.php?f=8&t=34886

2) I intentionally swapped the Left and Right plates, because doing so allows me to get even more caster-- the slots are longer in one direction (towards the back of the car) when swapped this way. So you will see the plate marked "R" is on the Left side (LHD Driver's Side) of the car.

:) But I understand, someone looking at my photos might install them "wrong" if all they ever wanted to do was to adjust strictly camber (in which case the photos you posted are right-- they should be 90 degree to the car straight travel axis).

And hey, thanks for the offer~ If any time you guys are in NYC, give me a heads up and I'll do what I can to help you~~ 8)
 

Roundy

New member
FYI with the brake bleeding/tab.

If you get a small hacksaw you can just cut a slot in the brake tab on the strut and bend half of it far enough to pull the brake line out without having to undo it, and then when you re-install it bend the half back into place and install the clips again.

Also, how do those camber bolts work???

I have some aftermarket ones but apparently they are a total pain to adjust as when you loosen them off they 'drop' and don't hold the previous camber they had.
 

cozmic512

New member
hey Mike,
wow that heater core job is killing me just looking at your pics.
Sorry about that. I am checking through the bgb to see if I can find anything.
but you're right its not listed anywhere logical...

let me know if you need a hand, or any tools when you get back to working
on it. The weather has been brutal lately but I think its going to start getting better now.
I can take a ride out and give you a hand, or at least some moral support..
:)

btw thanks for good words.
talk to you soon
 

mike325ci

New member
Roundy":2scfzkf9 said:
FYI with the brake bleeding/tab.

If you get a small hacksaw you can just cut a slot in the brake tab on the strut and bend half of it far enough to pull the brake line out without having to undo it, and then when you re-install it bend the half back into place and install the clips again.

Also, how do those camber bolts work???

I have some aftermarket ones but apparently they are a total pain to adjust as when you loosen them off they 'drop' and don't hold the previous camber they had.

Tab: Yes, I thought about that too (I believe the ones on my AW11 MR2 were like that-- you just bend it back b/c it was "split" into halves. Next time I have to remove the coilover/strut housing I'll do that.

Camber Bolts: Unlike aftermarket ones that are very thin in the middle section, the toyota crash bolts are thick enough and the same diameter in the middle section throughout (aftermarket ones have a rotating eccentric section and then the rest is really thin): They definitely tend to slip much less than aftermarket ones. Maybe this photo will help you (from TwosRUs's website):
http://www.twosrus.com/catalog/product_ ... cts_id=439


versus aftermarket camber adjustment bolts:
camber-blts-web.jpg


Cory, I probably *will* take you up on your offer!! I am not sure if you want to subject yourself to the torture, however, hehe... The dash removal just takes patience and putting bolts into labeled plastic bags (and hoping that when I put it back together I remember them all :twisted: )... But I will accept any help that is offered, of course! I could, however, use some help with stupid little things, like, removing those heater hoses from the firewall... ...and moral support :p I'll probably work on it for at least day this weekend... If you're serious, I'll give you a ring... I'll buy you lunch and if it's nice enough out take you out for a spin in the Exige, hehehe... :smokes: :evil: [Is that a good enough incentive??]
 

justjoe

New member
Those camber bolts look just like the Eibach camber bolts that we got for the Camry..
They work out great .. as long as you can figure out how to measure the camber correctly.
 
Top