You are using an out of date browser. It may not display this or other websites correctly.
You should upgrade or use an alternative browser.
You should upgrade or use an alternative browser.
Project Elephant: DeeCee's GT4A
- Thread starter deecee
- Start date
8/11/10 - Super Update Time! Part I
So I haven't done a decent update for ages. Been very busy at work and I normally get home mentally fatigued and with no energy to focus my attentions on the elephant.
But I have slowly being doing work on the the silly car, so I know that counts for something :lol:
Plus I have been buying lots of stuff, and you all know how that can be very enjoyable as well!
In this update (which will most likely be multi-part due to the amount of photos) I'm going to cover all the little things that I have done, purchases and any misc. stuff.
Oh and if my boss is reading this, sorry boss. Need to do focus on work life balance")
Engine
So I'd thought I'd just start from the start and get everything up.
Engine received (note: this was back in June 2008)

Putting onto the stand

Strip down


ST205 TB


More strip down

Initial clean up of all the grease and dirt build up on the engine.

W2A


#$%^&* I bent the water pipe (sigh) So obviously this was of great concern for me. Not too many st205 engines are broken down, so finding a replacement was going to be a bitch.
I actually found the gen3 3sge had a similar pipe according to the EPC, and luckily I found one up at pick a part and got it for $10.
But recently when putting the engine back together, I've found that there are issues. More on this later.

Bought a chinese special. 3" dump pipe with support bracket. This is obviously going to change with the holset, but I will still use temporarily while I run the CT20B/CT26R2

Ugh..

Okay, so after many months of waiting for a 3sge gen3 to come up to pick a part, the patience was rewarded with a 1996 celica and I was able to grab the oil pan, baffle and oil pick up to replace my dented baffle and lower pan.
If you remember, I posted this:

Well, after spending 8 hours up at the scrap yard, I finally got my replacement baffle and lower pan. I only took removing the ancillaries, engine from the bay, getting the auto box off, rounding an allen head bolt between the block and the box and rushing to the hardware store to get some vice grips and finally prising the oily parts away from the block, I had what I wanted.
Here is the comparison between the old bent baffle and the replacement. Some may say it wouldn't have affected performance or it could be bent back, but I'm too pedantic for that

As you can see, there is a slight deflection in the baffle. Enough for me to wait nearly a year for something to come up!

New oil pump to install

Engine gasket kit (thanks always to Mark @ Manawatu Toyota for the prompt parts delivery and great service )

Decided to clean all surfaces between cam cover and head of old gasket crap. Cam's came out for some reason as well :lol:

Replaced crank seals as well

All back together and sealed up

A little extra sealant was applied. No biggy though.

So this 3sge water pipe. Sigh. Good intentions, but as you can see, there are differences. Another difference was that the water pipe to oil cooler inlet/outlet (whatever) was shorter than the st205 one. Estimate for a new pipe was expensive to say the least. But I went to Howat engineering this past weekend, and the engineer said that since the pipe wasn't creased and no hole, then flow would be impeded minimally. Yay! No having to pay $$ for mistakes!

Decided to see what the differences between the throttle body diameters were.


Side by side comparison. The ST205 TB on the left doesn't have the inlet piece on it. St215 TB has the inlet piece as part of the TB body.

Purchase time. A powerful gt4 was being broken/sold on as the owner had decided to move in a different direction.
I was able to purchase a pile of things off him. Intercooler setup, including inlet pipe with tial bov mount, bar/tube intercooler, other intercooler piping; 3" dump pipe with WG pipe; 3" mid pipe with flexi; Carlos Sainz/RC bonnet - the bonnet was the most important thing for me. Rare as hen's teeth in NZ.


This is the engine as it stands at the mo. I won't lie. It's been over 2 years since the engine was stripped back and I've been trying to figure out how to put it all back together. I'm just glad Ii bagged and tagged all the stuff that came off! Getting there though

So ends this part of the update.
Oh - there is also an Audi A3 turbo block/head in my garage that my sister broke a cam on. I should either dump it or strip it down and see what can be salvaged. Prob just get rid of it tbh. Taking up too much room!
So I haven't done a decent update for ages. Been very busy at work and I normally get home mentally fatigued and with no energy to focus my attentions on the elephant.
But I have slowly being doing work on the the silly car, so I know that counts for something :lol:
Plus I have been buying lots of stuff, and you all know how that can be very enjoyable as well!
In this update (which will most likely be multi-part due to the amount of photos) I'm going to cover all the little things that I have done, purchases and any misc. stuff.
Oh and if my boss is reading this, sorry boss. Need to do focus on work life balance
Engine
So I'd thought I'd just start from the start and get everything up.
Engine received (note: this was back in June 2008)
Putting onto the stand
Strip down
ST205 TB
More strip down
Initial clean up of all the grease and dirt build up on the engine.
W2A
#$%^&* I bent the water pipe (sigh) So obviously this was of great concern for me. Not too many st205 engines are broken down, so finding a replacement was going to be a bitch.
I actually found the gen3 3sge had a similar pipe according to the EPC, and luckily I found one up at pick a part and got it for $10.
But recently when putting the engine back together, I've found that there are issues. More on this later.
Bought a chinese special. 3" dump pipe with support bracket. This is obviously going to change with the holset, but I will still use temporarily while I run the CT20B/CT26R2
Ugh..
Okay, so after many months of waiting for a 3sge gen3 to come up to pick a part, the patience was rewarded with a 1996 celica and I was able to grab the oil pan, baffle and oil pick up to replace my dented baffle and lower pan.
If you remember, I posted this:
Well, after spending 8 hours up at the scrap yard, I finally got my replacement baffle and lower pan. I only took removing the ancillaries, engine from the bay, getting the auto box off, rounding an allen head bolt between the block and the box and rushing to the hardware store to get some vice grips and finally prising the oily parts away from the block, I had what I wanted.
Here is the comparison between the old bent baffle and the replacement. Some may say it wouldn't have affected performance or it could be bent back, but I'm too pedantic for that
As you can see, there is a slight deflection in the baffle. Enough for me to wait nearly a year for something to come up!
New oil pump to install
Engine gasket kit (thanks always to Mark @ Manawatu Toyota for the prompt parts delivery and great service
)
Decided to clean all surfaces between cam cover and head of old gasket crap. Cam's came out for some reason as well :lol:
Replaced crank seals as well
All back together and sealed up
A little extra sealant was applied. No biggy though.
So this 3sge water pipe. Sigh. Good intentions, but as you can see, there are differences. Another difference was that the water pipe to oil cooler inlet/outlet (whatever) was shorter than the st205 one. Estimate for a new pipe was expensive to say the least. But I went to Howat engineering this past weekend, and the engineer said that since the pipe wasn't creased and no hole, then flow would be impeded minimally. Yay! No having to pay $$ for mistakes!
Decided to see what the differences between the throttle body diameters were.
Side by side comparison. The ST205 TB on the left doesn't have the inlet piece on it. St215 TB has the inlet piece as part of the TB body.
Purchase time. A powerful gt4 was being broken/sold on as the owner had decided to move in a different direction.
I was able to purchase a pile of things off him. Intercooler setup, including inlet pipe with tial bov mount, bar/tube intercooler, other intercooler piping; 3" dump pipe with WG pipe; 3" mid pipe with flexi; Carlos Sainz/RC bonnet - the bonnet was the most important thing for me. Rare as hen's teeth in NZ.
This is the engine as it stands at the mo. I won't lie. It's been over 2 years since the engine was stripped back and I've been trying to figure out how to put it all back together. I'm just glad Ii bagged and tagged all the stuff that came off! Getting there though
So ends this part of the update.
Oh - there is also an Audi A3 turbo block/head in my garage that my sister broke a cam on. I should either dump it or strip it down and see what can be salvaged. Prob just get rid of it tbh. Taking up too much room!
8/11/10 - Super Update Time! Part II
Before anyone says anything, yes I do start have a lot of little mini projects going on at the same time. If I didn't then just doing the same thing would be quite boring :lol:
Body:
Carlos Sainz/RC bonnet
I'll take a mould before painting. Gotta go lightweight or at least have a replacement in those times of need!
I did plan on asking someone if I could take a mould of their bonnet, but that would have meant flying around NZ, shipping the mould back to Wellington and that was if I absolutely couldn't find a bonnet. Glad Ii have something local I can work off now haha.

Driveline: June 2010
Drive shaft doesn't look in too bad condition

Bottom of the car is also in good condition. Minimal signs of any rust or corrosion. Lucky me

Sometimes my friends give me a hand every now and again. Scoob came over in the STI and was poking around under the rear of the car helping me remove the rear driveline.
Bit of plumbers crack there hahahaha :lol:

So after unbolting the rear subframe and lowering on the jack, the elephant is coming apart slowly.


Bit rusty, though I've seen worse. I like the small collection of stones on top of the diff. Found similar on the subframe itself which I'm currently cleaning.

Overall, rubbers aren't in bad condition. Undecided whether I'll replace. I'm sure it's going to cost me in parts from Japan. Won't be going solid bushings. I like some comfort.

Diff cushion is cracked. Will have to cut out and re-poly.

So one of the long suspension arms is bent (no pic yet). I saw a trace of rust under the paint. Better inspect.

Err.. will clean up that mess

New front and rear bearings for hub conversions for brake upgrade

New ball joints from Mark @ Manawatu Toyota again ( I see a trend here )

Electrics: April 2010
Starter motor was begging attention - looks so dirty! So I decided to take it apart and inspect and start cleaning.


Brushes are fine

Cleaned up the crap on the armature

More inspection - this time the solenoid.


Hmmm... new toy Link G3 LEM with 55psi MAP sensor internal Thanks Matt D


Before anyone says anything, yes I do start have a lot of little mini projects going on at the same time. If I didn't then just doing the same thing would be quite boring :lol:
Body:
Carlos Sainz/RC bonnet
I'll take a mould before painting. Gotta go lightweight or at least have a replacement in those times of need!
I did plan on asking someone if I could take a mould of their bonnet, but that would have meant flying around NZ, shipping the mould back to Wellington and that was if I absolutely couldn't find a bonnet. Glad Ii have something local I can work off now haha.
Driveline: June 2010
Drive shaft doesn't look in too bad condition
Bottom of the car is also in good condition. Minimal signs of any rust or corrosion. Lucky me
Sometimes my friends give me a hand every now and again. Scoob came over in the STI and was poking around under the rear of the car helping me remove the rear driveline.
Bit of plumbers crack there hahahaha :lol:
So after unbolting the rear subframe and lowering on the jack, the elephant is coming apart slowly.
Bit rusty, though I've seen worse. I like the small collection of stones on top of the diff. Found similar on the subframe itself which I'm currently cleaning.
Overall, rubbers aren't in bad condition. Undecided whether I'll replace. I'm sure it's going to cost me in parts from Japan. Won't be going solid bushings. I like some comfort.
Diff cushion is cracked. Will have to cut out and re-poly.
So one of the long suspension arms is bent (no pic yet). I saw a trace of rust under the paint. Better inspect.
Err.. will clean up that mess
New front and rear bearings for hub conversions for brake upgrade
New ball joints from Mark @ Manawatu Toyota again ( I see a trend here
)
Electrics: April 2010
Starter motor was begging attention - looks so dirty! So I decided to take it apart and inspect and start cleaning.
Brushes are fine
Cleaned up the crap on the armature
More inspection - this time the solenoid.
Hmmm... new toy
Link G3 LEM with 55psi MAP sensor internal Thanks Matt D
8/11/10 - Super Update Time! Part III
My AC removal: Found these pics from 2006 :lol:
So the AC was shot. I already had plans to mount a sub in the dash based on my experiments:

Let's get this #$%^ out! AC gas was already gone, and I didn't really want the extra crap in the bay. Also, at the time, I needed to fit larger batteries for my audio.


Was an interesting experience finding out how the lines snaked through the bay. This was before I had the BGB's and EPC to guide me.

Wow- garage was kind of empty hahaha

Hmm.. that was it? Oh well.. in the bin in went

Engine Bay February - October:
So this is where I left a previous update..

So the aim here was to clean up all the road grime and built up crap around the bay and in the guard areas. Seriously, it was the worst job cleaning up all this.
Ideally, it would have been easier media blasting, but hey, it's me and there is always a reason why I do things the way I do.
February
In this case, I didn't want to remove the old underseal in the guards. a) it's a messy job b) what do I gain from something that I won't see? c) i won't have to reapply underseal, though I am going over with a plastic liner material to ensure that there is more than adequate protection.

Found a little bit of rust where the suspension was in contact with the body. Will clean up before liner application.

The build up, while under flash, was actually quite bad. I initially thought that some areas were painted black. How wrong I was. The black on the tow hook is actually dirt!

Cleaned up.

Amazingly white under here.


One of the things I wanted to do was delete holes and major depressions in the bay.
Commonly, hotrodders will delete the firewall and smooth out the bay. For me, this was not a focus.
The main reason is that I've been to many car shows and I smoothed out engine bay is actually rather boring.
Who wants to see an engine sitting in a shiny box? Not I! The contours and shapes within a bay give more character and actually interesting.
Then again.. deletion of the engine loom hole, AC pipe and heater pipe holes time hehe
3 holes to delete

studs sticking out.. need to get rid of those! Angle grinder time..

goneburgers

not too bad. Reasonably clean job.

so i had to get to the firewall. I store a bunch of shite in the cabin most of the time.. whats that down the back?

Why there are some cusco front and rear strut braces. Brand new, but will be stripped of the blue. I have my colour codes firmly in mind with white as the primary colour and red/black accents.

Great.. a bit of room to work in now.

First things first.. clean up the replacement metal. Jonno had already used this panel for his widebody kit.

I cleaned up the glue and other crap then grabbed the paint stripping disc to get some clean metal.

Voila

Double skinned firewll. Plan is to weld from the interior side so that nothing is protruding on the engine bay side.

Time to make some templates.


3 templates made.

Added a weld buffer for me to push the metal up against the back of engine bay metal of the firewall.

Cut and traced.

Interior shot, fit's like a charm

Some gear that was borrowed. Mask for Jonno, mask for me. I really need to learn how to weld. This is a TIG welder I can borrow after all lol.

Welded up. Jonno used rods, but ideally we would have got the auto feed mig, but that was in use building a garage haha.

Oops.. drop plastic got burnt up with all the sparks haha.

Little mess under the plastic. Not too bad and the concrete pad is still protected to this day after a couple of years living under plastic.

Grabbed some new plastic and duct tape and did the fix it job - easy peasy

Oh - Speed Source solid engine brace mounts. Fancy! Decided that I would play and see how they fit.

Not bad.. but oh no.. what do I see? A dent in the metal member running across More on this later..

Considering I didn't remove the gearbox and engine orginially, I actually had no idea how the brace fitted. Oh well, worked it out

fibrglass infused filler. Strong, but a bitch to sand. Note, the left hand side of the pic. The weld areas for the centre brace on the interior side had depressions. They were filled up and smoothed out.
That was the extent of the smoothing on the firewall.

after all the seam sealer was removed, smoothing done with filler (not on any seams mind you..) and some spray putty to check smoothness, this is a high shot of the bay - 12 March 2010

Thought I'd get fancy with the merge function in photoshop. Saved me from manually merging the photos in Adobe Fireworks. Yes, ASI radiator on the back.

Etch primed ready for seam sealing.

Another fun photo merge

This is an example of how I did the seam sealing. I carefully taped and cut around the seams and then applied the sealer. Then I removed the tape and smoothed out with my fingers before the sealer skinned.
I used wax and grease remover to keep the sealer flexible while smoothing out.

Nish came around and watched me for a couple of hours. I made him tape up some bits..

And this is the bay as it currently stands. Due to the method I used, it took quite a while to get the seam sealer done. Tape, seal, remove tape, smooth. Repeat over and over and over.. many hours and cramped fingers, but its all worth it

My AC removal: Found these pics from 2006 :lol:
So the AC was shot. I already had plans to mount a sub in the dash based on my experiments:
Let's get this #$%^ out! AC gas was already gone, and I didn't really want the extra crap in the bay. Also, at the time, I needed to fit larger batteries for my audio.
Was an interesting experience finding out how the lines snaked through the bay. This was before I had the BGB's and EPC to guide me.
Wow- garage was kind of empty hahaha
Hmm.. that was it? Oh well.. in the bin in went
Engine Bay February - October:
So this is where I left a previous update..
So the aim here was to clean up all the road grime and built up crap around the bay and in the guard areas. Seriously, it was the worst job cleaning up all this.
Ideally, it would have been easier media blasting, but hey, it's me and there is always a reason why I do things the way I do.
February
In this case, I didn't want to remove the old underseal in the guards. a) it's a messy job b) what do I gain from something that I won't see? c) i won't have to reapply underseal, though I am going over with a plastic liner material to ensure that there is more than adequate protection.
Found a little bit of rust where the suspension was in contact with the body. Will clean up before liner application.
The build up, while under flash, was actually quite bad. I initially thought that some areas were painted black. How wrong I was. The black on the tow hook is actually dirt!
Cleaned up.
Amazingly white under here.
One of the things I wanted to do was delete holes and major depressions in the bay.
Commonly, hotrodders will delete the firewall and smooth out the bay. For me, this was not a focus.
The main reason is that I've been to many car shows and I smoothed out engine bay is actually rather boring.
Who wants to see an engine sitting in a shiny box? Not I! The contours and shapes within a bay give more character and actually interesting.
Then again.. deletion of the engine loom hole, AC pipe and heater pipe holes time hehe
3 holes to delete
studs sticking out.. need to get rid of those! Angle grinder time..
goneburgers
not too bad. Reasonably clean job.
so i had to get to the firewall. I store a bunch of shite in the cabin most of the time.. whats that down the back?
Why there are some cusco front and rear strut braces. Brand new, but will be stripped of the blue. I have my colour codes firmly in mind with white as the primary colour and red/black accents.
Great.. a bit of room to work in now.
First things first.. clean up the replacement metal. Jonno had already used this panel for his widebody kit.
I cleaned up the glue and other crap then grabbed the paint stripping disc to get some clean metal.
Voila
Double skinned firewll. Plan is to weld from the interior side so that nothing is protruding on the engine bay side.
Time to make some templates.
3 templates made.
Added a weld buffer for me to push the metal up against the back of engine bay metal of the firewall.
Cut and traced.
Interior shot, fit's like a charm
Some gear that was borrowed. Mask for Jonno, mask for me. I really need to learn how to weld. This is a TIG welder I can borrow after all lol.
Welded up. Jonno used rods, but ideally we would have got the auto feed mig, but that was in use building a garage haha.
Oops.. drop plastic got burnt up with all the sparks haha.
Little mess under the plastic. Not too bad and the concrete pad is still protected to this day after a couple of years living under plastic.
Grabbed some new plastic and duct tape and did the fix it job - easy peasy
Oh - Speed Source solid engine brace mounts. Fancy! Decided that I would play and see how they fit.
Not bad.. but oh no.. what do I see? A dent in the metal member running across
More on this later..
Considering I didn't remove the gearbox and engine orginially, I actually had no idea how the brace fitted. Oh well, worked it out
fibrglass infused filler. Strong, but a bitch to sand. Note, the left hand side of the pic. The weld areas for the centre brace on the interior side had depressions. They were filled up and smoothed out.
That was the extent of the smoothing on the firewall.
after all the seam sealer was removed, smoothing done with filler (not on any seams mind you..) and some spray putty to check smoothness, this is a high shot of the bay - 12 March 2010
Thought I'd get fancy with the merge function in photoshop. Saved me from manually merging the photos in Adobe Fireworks. Yes, ASI radiator on the back.
Etch primed ready for seam sealing.
Another fun photo merge
This is an example of how I did the seam sealing. I carefully taped and cut around the seams and then applied the sealer. Then I removed the tape and smoothed out with my fingers before the sealer skinned.
I used wax and grease remover to keep the sealer flexible while smoothing out.
Nish came around and watched me for a couple of hours. I made him tape up some bits..
And this is the bay as it currently stands. Due to the method I used, it took quite a while to get the seam sealer done. Tape, seal, remove tape, smooth. Repeat over and over and over.. many hours and cramped fingers, but its all worth it
8/11/10 - Super Update Time! Part IV
Transmission stuff
Rermember the gear leaver mechanism? December 2009


And no, I didn't leave them in the vinegar for 3 months
Come February 2010..
After a couple of days, the levers were removed from the vinegar. I then cleaned them up, started sanding and polishing. Probably one of the few things I'll polish myself as it took bloody ages!

Main mounting plate was quite rusted if you remember.

Just some other bits and bobs that went into the vinegar. A-arm washers, starter motor bolts, metal washer mount thingys

rusted vs vinegar dipped.

As you can see, the vinegar left a film from the zinc coating on the metal.

both gen1 and gen 2 mounting plates were dipped.

The rust build up.. no one likes rust.

small amount of rust on the gen 1 mounting plate.

I put under some water and the film wiped away I still went over with a plastic scrubbing pad to get rid of the deep rust that was still present.


Etch primed - April 2010

7 November 2010. Actually got around to finishing these up. Etch priming protected them so no issues there. Some zinc paint tarts them up some

Thought I better take some pictures today. This the gear lever mechanism. Sugar cube had minimal wear on it.


I had my clutch plate machined by Hutt City Engine Reconditioners. Cheap and its machined, not lathed

RPM HD clutch..


Couldn't be bothered to open the box, but the HD plate is in there

Speed Source stainless braided clutch hose

Right - midnight.. and i need to get up in 6 hours for work.
I'll update another little bit tomorrow, radiator fitment fun
Hope you all enjoy
Cheers
Dave
Transmission stuff
Rermember the gear leaver mechanism? December 2009
And no, I didn't leave them in the vinegar for 3 months
Come February 2010..
After a couple of days, the levers were removed from the vinegar. I then cleaned them up, started sanding and polishing. Probably one of the few things I'll polish myself as it took bloody ages!
Main mounting plate was quite rusted if you remember.
Just some other bits and bobs that went into the vinegar. A-arm washers, starter motor bolts, metal washer mount thingys
rusted vs vinegar dipped.
As you can see, the vinegar left a film from the zinc coating on the metal.
both gen1 and gen 2 mounting plates were dipped.
The rust build up.. no one likes rust.
small amount of rust on the gen 1 mounting plate.
I put under some water and the film wiped away
I still went over with a plastic scrubbing pad to get rid of the deep rust that was still present.
Etch primed - April 2010
7 November 2010. Actually got around to finishing these up. Etch priming protected them so no issues there. Some zinc paint tarts them up some
Thought I better take some pictures today. This the gear lever mechanism. Sugar cube had minimal wear on it.
I had my clutch plate machined by Hutt City Engine Reconditioners. Cheap and its machined, not lathed
RPM HD clutch..
Couldn't be bothered to open the box, but the HD plate is in there
Speed Source stainless braided clutch hose
Right - midnight.. and i need to get up in 6 hours for work.
I'll update another little bit tomorrow, radiator fitment fun
Hope you all enjoy
Cheers
Dave
I've done my 100+ pic update. Only took 5.5 hours of selecting, editing, uploading, deleting and re-uploading photos due to wrong file naming hahaDudeMan":2n1barbl said:Right on man.
This has always been one of my favorite project threads!
I was actually gonna bitch at you to update it the other day.. But I still gotta update mine big time so oh well.
Oh, holy fuckin' Holset!
Your turn
Cheers Mike. You know... it cut me that you installed my old c-one camberplates into those messy guards :doh: hahaha
But yeah, I have my expectations and they are detailed focussed. Just my nature, for the most part.
At the end of the day, there is nothing majorly different to what others do or are doing. I reckon I just take a couple of extra photos and talk more crap though haha.
As I've said, I've been to many car shows over the past 5 years in spectator and judging capacities so I have a strong appreciation of people's work or their lack thereof. I just came to the conclusion that I could build up a more interesting car then they could, and by no means will I attain to some levels that hot-rodders will go to, but I'm doing my best to be my best
DeeCee":36o6tooh said:I've done my 100+ pic update. Only took 5.5 hours of selecting, editing, uploading, deleting and re-uploading photos due to wrong file naming hahaDudeMan":36o6tooh said:Right on man.
This has always been one of my favorite project threads!
I was actually gonna bitch at you to update it the other day.. But I still gotta update mine big time so oh well.
Oh, holy fuckin' Holset!
Your turn
Well I guess I got called out on that one.. :
Luckily I've been keeping my project thread on CelicaTech up to date so it'll be a little easier.
I honestly don't even have time to go through your update yet cause I have to go do body work.. Winters about a foot from my doorway.
I'll check it out tonight before I start workin' on my update.
Everything is coming along very well, your meticulous as always!
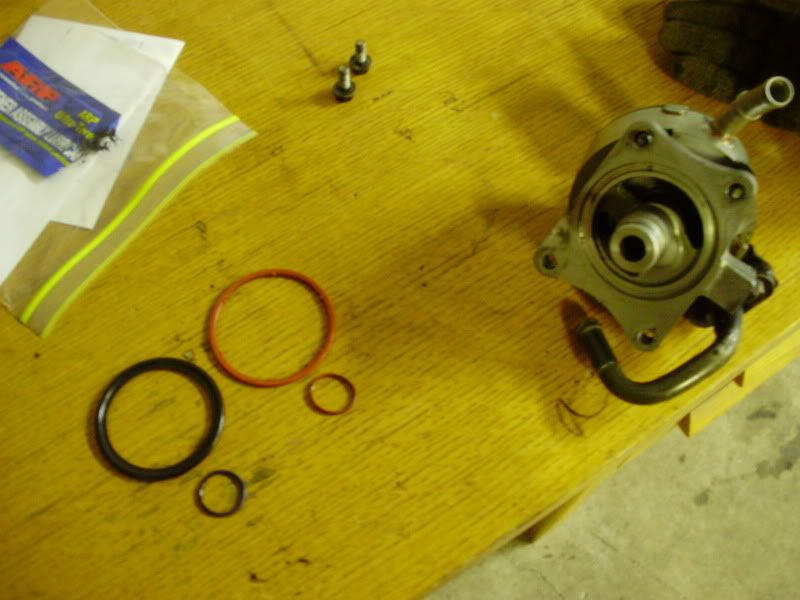
I have a question though. See the orange O-ring in this pic by the turbo gaskets? Is that for the oil cooler?

I bought a overhaul gasket kit from Toyota a few weeks ago and mine didn't include either of the orange O-rings for the oil cooler. Maybe I should call them back and complain..
Looking forward to buttoning up that dash? Shit that looks like a lot of work.
And you said the hybrid CT26 will be going on before the Holset?
I have a question though. See the orange O-ring in this pic by the turbo gaskets? Is that for the oil cooler?
I bought a overhaul gasket kit from Toyota a few weeks ago and mine didn't include either of the orange O-rings for the oil cooler. Maybe I should call them back and complain..
Looking forward to buttoning up that dash? Shit that looks like a lot of work.
And you said the hybrid CT26 will be going on before the Holset?
Dash - old picture from some years back. Will obviously change when I get into the audio side of things, especially since I'll be crafting my own modern looking dash / crash pad. All new gauges, new air/heater system etc.
The factory CT20b will go on before the Holset, but I'll be test fitting the Holset etc and making sure I can swap over in a day, not take a week to do. Tricks
And my new oil pump came with new washers. I don't believe my kit came with new oil pump washers. I'll have to check.
The factory CT20b will go on before the Holset, but I'll be test fitting the Holset etc and making sure I can swap over in a day, not take a week to do. Tricks
And my new oil pump came with new washers. I don't believe my kit came with new oil pump washers. I'll have to check.
Custom dash.. Sounds slick. 8)
I was actually talking about the oil cooler, as you can see in this picture. The two orange O rings were on the oil cooler when I pulled it from the engine, but they were not included in my overhaul kit. The two black ones were the closest I could find but their not right..
You can see the big one by the turbo gaskets in the pic I pointed out. I'm pretty sure the Toyota dealership I bought it from forgot them.

LegacyofDan
New member
nice catch man
it was a planned video
I had popped the seals on the hub carriers quite a few times that I set up the next 'pop' for the camera.
Lots of photos still to add, been doing more work, but too busy to sort out photos as I'm building a blog currently. Along with work, no real time to spend posting up lots of pics.
Also, I'll be heading down to the Christchurch earthquake site to support work colleagues in 3 weeks time, so that will delay a little time on the car as I'll be on the weekend shift.
testing something out.. writing up an excel spreadsheet of all the stuff i've bought. I'm sure there is more to add, but this is just from think for the past 1/2 hour or so.
4 x NGK Iridium Sparkplugs
2 x Nolethane front swaybar bushes
2 x Nolethane rear swaybar bushes
2 x front swaybar links
2 x rear swaybar links
1 x diff cushion
2 x front lower ball joint
2 x Power steering rack cushions
1 x Thermostat
2 x Rear brake pads st205 2 pot
1 x 3" Catalytic Convertor
2 x Jun Auto Adjustable Cam Sprockets
4 x Tein HA 16 way adjustable coilover suspension
2 x Speedsource front and rear engine mounts
1 x RPM heavy duty clutch and clutch plate
1 x Speedsource stainless braided clutch hose
1 x Sard fuel pressure regulator
1 x Thermostatic oil bypass valve
2 x 9 row stainless oil cooler
1 x 19 row stainless oil cooler
2 x 10" radiator fans
1 x TWM performance short shift kit
1 x Speedsource extended clutch pin
1 x Speedsource aluminium crossmember bushings kit
1 x ST205 Engine
2 x Nissan GTS25T Alloy 4 pot calipers
2 x Toyota st205 rear 2 pot calipers
2 x Toyota st205 brake discs
2 x Subaru WRX 325x30mm front brake discs
1 x Walbro 255L fuel pump
1 x power steering belt
1 x alternator belt
1 x Gearbox rebuild with 1x syncro hub and all new syncros
1 x st205 oil filter
1 x ASI 56mm aluminium radiator
4 x CV joints
2 x steering rack boots
2 x st215 rear hubs
1 x st215 side feed inlet manifold and throttle body
1 x st205 gasket set
2 x wrx seats
1 x Holset HX35
1 x ST185 GT4 RC bonnet
1 x intercooler and piping
4 x 18x7.5 wheels + tyres
2 x st205 silicon radiator hoses
1 x silicon hose kit
1 x Link LEM G3 w/ 4bar MAP sensor
2 x st185 rev2 rear tail lights and plint
4 x Sard 800cc side feed high impedence injectors
1 x st185 rev2 clutch pedal
1 x Speedsource shifter cable bushing kit
1 x ST185 GT4 RC bumper and support
1 x 3" downpipe
1 x HKS silent hi-power exhaust
1 x custom downpipe and midpipe
2 x st182 rev2 engine mounts
1 x st182 rev2 shifter assembly
7 x gauges
3 x st202 hubs
1 x st182 hub
2 x side mirror sets
1 x st202 3sge sump and oil pan setup
1 x water pump
2 x cusco front and rear strut tower bars
1 x oil pump
1 x timing belt
4 x wheel bearings
1 x Ace engineering underbody brace
edit - seems to work out
Oh the joy of actually calculating the cost of the modifications. I don't dare work out hours....