You are using an out of date browser. It may not display this or other websites correctly.
You should upgrade or use an alternative browser.
You should upgrade or use an alternative browser.
Nitro Alltrac's '92 185
- Thread starter Nitro_Alltrac
- Start date
Wicked Toys
New member
Good progress Mike.
Like said all these latest W2A ideas have been a huge help for me too. And I as well and digging the volt gauge idea.
Like said all these latest W2A ideas have been a huge help for me too. And I as well and digging the volt gauge idea.
Nitro_Alltrac
New member
I like the volt gauge. If I would of had this the end of April/first of May, I wouldn't have needed to have the car towed due to the dead alternator. I looked into the aftermarket gauges and almost went that way. I got the GTS cluster from a guy on Celicatech for $20. I like the stock look to it. It's working great so far.
darthripley
Moderator
looking good Mike - good to see you making progress with the ST205 WTA setup.
the voltmeter idea is nice & you did a really nice install with it.
i just really hate how vague the stock voltmeters are, like the boost gauge.
the AFR gauge i have also has a turbo timer & voltmeter built into it which is nice to see actual numbers for voltage instead of just guessing.
we were in san antonio to pick up an MR2 shell this past friday - thought of you but it was so late & we wanted to make the trip all in one day. we waved hi to you though lol
Nitro_Alltrac
New member
That's Keri.
Next time you guys are down this way, give me a yell. I was off Friday getting the car registered. It wasn't as bad as I had expected. I was going to get my driver's license done but they were lined out the door of the building 15 deep and I can only imagine how many were inside. Last day of the month so what do I expect.
I'd like to get up and see you guys and your collection soon. Hopefully I can work that out. Mixmaster and I are going to meet up here soon. He's got a 205 TB coupler coming in with some other stuff from the UK. Hopefully we can all get together sometime in the fall for a mini-meet.
Looks nice Mike!
I'm sending you a PM about the one in the yard.
Might make a trip down there fri if they have what I need. Are you going to be around?
I gave no love on the drive through either. I was in South Padre until Sunday though but waved as I passed through S.A. also...lol
Whenever Joe and Keri are ready, I'm up for the meet.
darthripley
Moderator
I wasn't sure what part of town you lived in or anything. We were picking up the car around 35 & Weinard?? (can't totally remember)
The U-Haul place we had to go to was at Military Dr. about 25 minutes from where the car was. :shoots:
We will definitely have to get together in the fall for a meet/hill country cruise when some of this damn heat goes away. I'm thinking maybe after Halloween but way before Thanksgiving.
It's even gotten to me lately being 102-105 up here in Dallas lately ... we were working outside Saturday unloading the U-Haul & Joe made me go inside b/c I was close to a heat stroke - I didn't realize I had stopped sweating :|
Be sure & shout if you're up in this neck of the woods too - you're welcome to come by & visit anytime
Same thing goes for you Mixmaster - we owe you a dinner & beer!
Nitro_Alltrac
New member
Been a while so a quick update on something I did today.
I finally found a shifter plate that had good tabs to hold the shift boot in place. The only thing was it was scuffed up and didn't look so good. I had thought about painting it but wasn't really keen on that idea. I had seen so thing about the 3M vinyl that has the carbon fiber pattern on it and had considered using it. I think the Captain or someone here has a post about using it. Any way, I finally broke down and bought a few feet of it off of Ebay last week. It came in the mail on Monday so I decide to go head and try to put it on today. It was a lot easier than I thought it would be. I did check out a few install vids on YouTube first and that helped a lot.
Here are a few pics of the process.
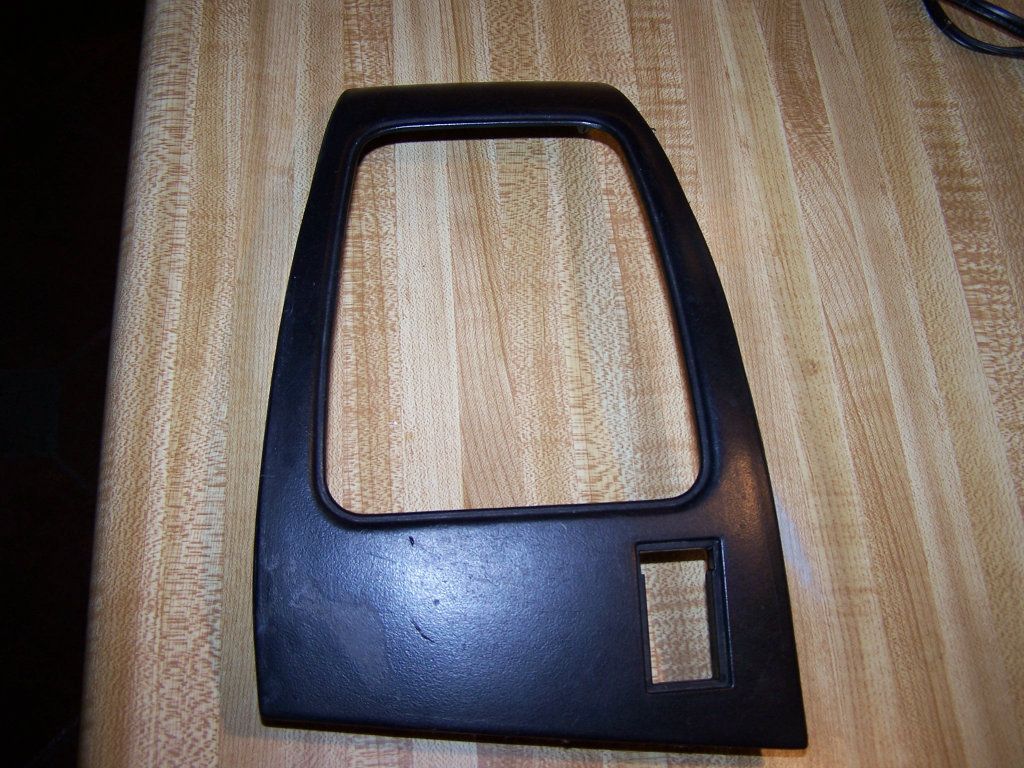
Here's what I started with. I cleaned the plate really good with Mean Green degreaser first to make sure that the vinyl would stick good.
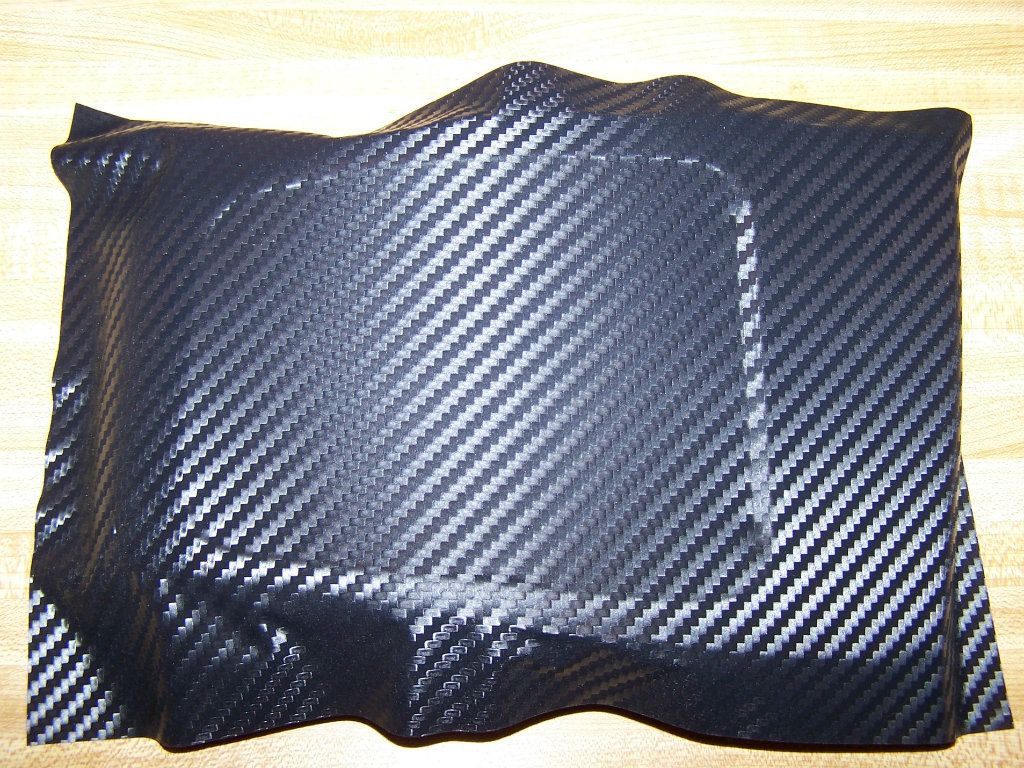
The vinyl I bought is about a foot wide so I cut a piece that allow for some overlap. Here's what it looked like after just laying the vinyl over the plate.
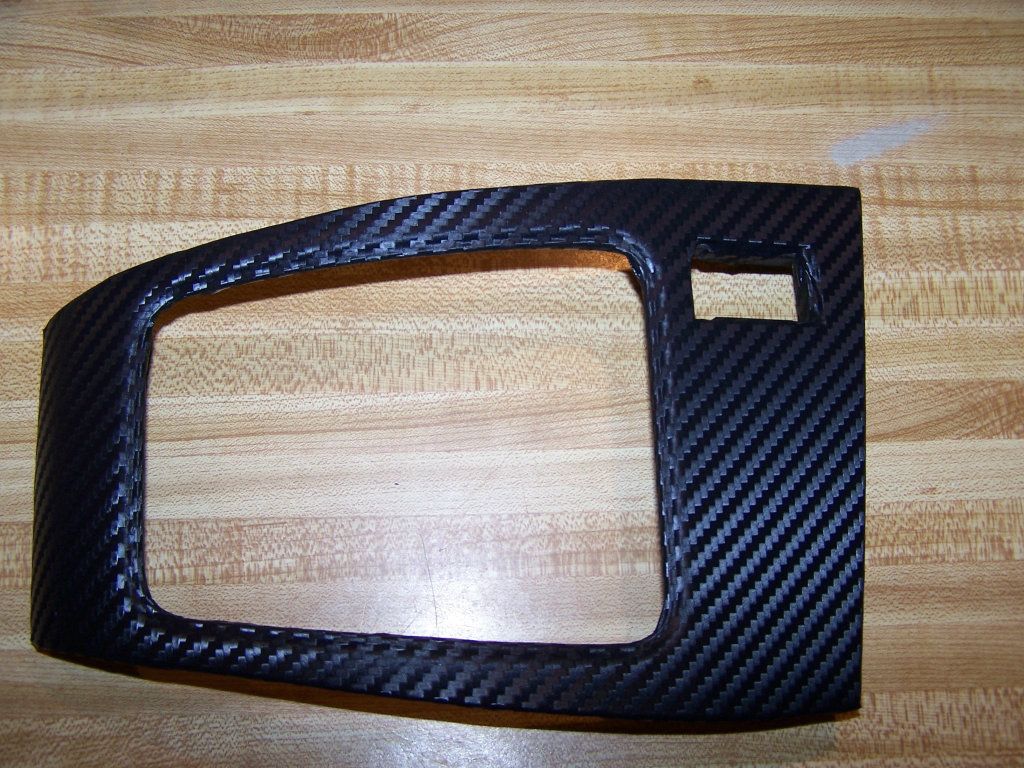
I spent about 10-15 minutes working with a hair dryer to get it formed over the corners and edges. That worked really well and was pretty easy. A regular hair dryer running high softened it up really good and allowed it form over the plate. Here's what it looked like after it had been heated and trimmed up.
Once that was done, it was just a matter of reinstalling the plate back in the car.
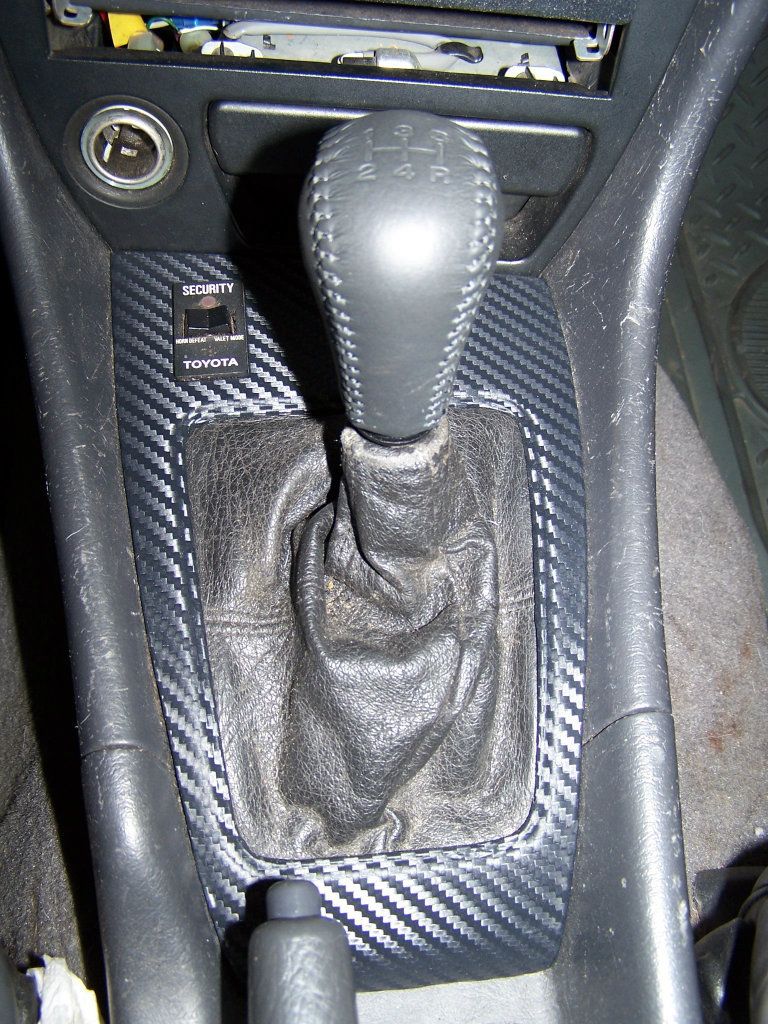
This was really easy to do and I think makes a big difference in the interior. I've still got some more and I'm trying to decide what else I'm going to use it for. I'm thinking about doing the radio plate next.
I finally found a shifter plate that had good tabs to hold the shift boot in place. The only thing was it was scuffed up and didn't look so good. I had thought about painting it but wasn't really keen on that idea. I had seen so thing about the 3M vinyl that has the carbon fiber pattern on it and had considered using it. I think the Captain or someone here has a post about using it. Any way, I finally broke down and bought a few feet of it off of Ebay last week. It came in the mail on Monday so I decide to go head and try to put it on today. It was a lot easier than I thought it would be. I did check out a few install vids on YouTube first and that helped a lot.
Here are a few pics of the process.
Here's what I started with. I cleaned the plate really good with Mean Green degreaser first to make sure that the vinyl would stick good.
The vinyl I bought is about a foot wide so I cut a piece that allow for some overlap. Here's what it looked like after just laying the vinyl over the plate.
I spent about 10-15 minutes working with a hair dryer to get it formed over the corners and edges. That worked really well and was pretty easy. A regular hair dryer running high softened it up really good and allowed it form over the plate. Here's what it looked like after it had been heated and trimmed up.
Once that was done, it was just a matter of reinstalling the plate back in the car.
This was really easy to do and I think makes a big difference in the interior. I've still got some more and I'm trying to decide what else I'm going to use it for. I'm thinking about doing the radio plate next.
darthripley
Moderator
looks good Mike, nice job getting it all formed around the edges.
Nitro_Alltrac
New member
It was really easy getting it to form around the curves and edges. Used the wife's hair dryer to apply some heat and it went right into place. Some people on YouTube were using heat guns but the hair dryer worked fine on this 3M film.
aus jd 2703
New member
i thought you could swap the whole cluster from a ST184?
i swapped mine and the volt meter works
i swapped mine and the volt meter works
Nitro_Alltrac
New member
You could probably swap the entire cluster but I wanted to the keep the All Trac speedo as it reads higher than the GT-S and I also wanted to keep my actual mileage too.
aus jd 2703
New member
ahh ok see i just swapped the spedo over and kept the tacho and volt meter from the 184...
Nitro_Alltrac
New member
Time for some updates. As some of you know, I've been working on the suspension and trying to finish up.
I've been needing to do some suspension upgrades to the car for a while but I've been putting it off. In January of 2011, gtfour77 put a set of Koni RACE series struts up for sale. I talked with Martin about them and he had used on them on the back of his car for part of an autocross season and was going a different route. After talking it over with him, we decided they'd work for what I was wanting to do so I bought them. They came in a set of All Trac rear strut housings that had already been modified for use with the Konis. The only thing was that the spring perches had been cut off for use with coilover sleeves. At the time, I wasn't sure what route I was going to go, use sleeves or swap them into another set of housings with the spring perches. With moving into the new house and getting the wife down here, I put them in the garage cabinet and went on with other things.
Sometime last year I bought a used set of Ground Control coilovers from a member here but wasn't sure about the spring rates so I ended up selling them. This summer, I finally broke down and ordered the Konis for the front of the car. It took a while to get them as they had to special order them from Koni.
Not long after I got them, l0ch0w put up a complete set of struts with Koni inserts and lowering springs for sale. I went ahead and bought these from him with the idea of using the housings with the inserts I already had.
Once I got them, I found some numbers on the springs and tried to identify them. Didn't have a whole lot of luck there but I did find out that these struts had been floating around for a while and it didn't really look like anybody had installed them. So, I went ahead and started tearing them down to install my inserts. The fronts went really well and they had the same Koni insert that I had just purchased in them. I went ahead and installed my new ones. (The ones that I took out are in good shape and I'll be looking to sell these soon.)
The back ones ended up being a different story. I took the gland nut off the top of one like I had with the front ones but to my surprise there was no insert. The actual guts of the strut came out with the oil. The reason this was surprising was that the strut housing were rear All Trac struts that had been converted to use inserts (All Trac rear struts are sealed and to use inserts the top has to be cut off and about 2" from a front strut with the threaded top has to be welded on). I looked at the bottom of the strut and it had the bolt that some Koni inserts use but I've never seen anything like this from Koni. There are a couple of holes in the welds that you could see through and the inserts were yellow and they are adjustable. I tried to get the insert out of the housing but nothing I did would get the insert out. They're in there to stay. So at this point I figured I'd just put oil back in the one I opened and use these on the back. This didn't work. I used fork oil like a lot of people suggest but I never could get the strut to work right.
So, now the plan became to take my rear struts off the car, cut the tops and weld the tops on from the ones I got from gtfour77 and use the original inserts I purchased.
Today, I started my install with the front ones that I had ready to go. The left one went on great. It took about half an hour to get it installed. I did have to use a cheated pipe to break the bolts loose but no problems. I got it put back together and installed the camber bolt kit. It's ready to go. I moved around to the right side and first found that I had forgotten to break the lug nuts loose. I had to lower the car and do this. Once I had the wheel off, I sprayed the bolts down with PB Blaster and waited a while. After this, I found out that the car was too close to the garage wall to use the same piece of pipe I had used before. So, I pulled the top off of my jack handle and used it. I put it on the handle of my rachet and applied pressure. Pop, it sounded like the bolt broke loose. WRONG, I had just suceeded in breaking my rachet that I've had for 30 years. That sucked. So I went and got my breaker bar, snapped the socket on it, put the cheater on it and applied pressure. Pop, the bolt came loose. Wrong again, the damn stud that goes into the socket had sheared off the breaker bar! I've had that thing for 30 years as well but I've probably used it 8 or 10 times in all those years.
So any way, at this point I figured I had better stop for the evening. Tomorrow I'm getting the impact out and that had better break the damn things loose. Once I've got the bolts loose, the right front shouldn't take too long to swap out. I'm just hoping that the rears don't have a ton of surprises. I would like to get this project done and move on to other things.
Well today went better although I did manage to break a Kobalt 1/2 to 3/8 adapter first thing is morning. Sheared right off at the base.
Any way, I found out that my pneumatic impact has weak sauce. I used it on the right front bolts that were giving me grief. I managed to get the top on off with it after using some heat but it wouldn't budge the bottom even after heating the hell out of it. I finally used my 1/2" rachet with the impact socket and a short section of jack handle. I got the right front installed in about an hour and half.
After that I move to the back. I started with the left rear and it came off fairly easy. Once I had it off, I had to tear it down and cut the top off of it. Once that was done and cleaned up, I test fitted the Koni insert to see how much I needed to cut off of the other housing housing and weld onto this one. I had to add an 1 1/2" section to the housing. This all went well. I got it cut and cleaned up pretty easily even though the pipe cutter I got at Harbor Freight is a POS. I also got a chance to tryout the new auto darkening welding helmet I got for Christmas. It worked really well. I was pretty pleased with how the weld job came out as I haven't welded much. It looked pretty good and didn't break when I tighted the gland nut down, so I must have done something half way right.
Once this was done, I put the unit back together with the lowering spring. This went well and I got the strut back on the car although I did manage to drop one of the top mount nuts down between the strut tower and the interior trim. Luckily I found a replacement in my spares box and didn't have to tear the interior apart.
As of now 3 of the 4 struts are changed out. I'm going to try and get the last one done before the wife gets back from WV on Friday. I have to go back to work on Wednesday so I don't know how that will work out.
Got the last strut housing converted, the insert installed and the right rear suspension reinstalled on the car tonight. Just have to tighten the lug nuts, get the car back on the floor and a four wheel alignment and this project is finally done. The struts on rear came off fairly easy and converting the housings wasn't too bad at all. That went a lot better than I had figure. If I had know it would go this well, I would have just converted the housings a month ago and been done with this.
I still have it up on the jack stands. I have a little exhaust work to do so I figured that while it was up in the air I'd get the parts and fix that as well.
As far as installing inserts on the strut housing already made for them (the ones with gland nut already) this can be easy or it can be a complete bitch. I know that doesn't make a lot of sense but I'll explain. The gland nut screws down into the top of the strut housing. It's got about 3/8 to 1/2" of fine threads. It also, more than likely, is round (although the ones on the housings I got from gtfour77 actually looked like nuts on top) and will require either a pipe wrench or the special gland nut wrench. I bought one of the gland nut wrenchs but it didn't really work much better than the pipe wrench.
Any way, you won't really know until you start how hard the gland nut is going to be to get off. One of the four, one of the front housing, came off with just the pipe wrench. The other front one come off with the pipe wrench and a 5 foot cheater pipe on the end of it. One of the rear ones that ended up not using was a complete bitch. It took the pipe wrench, the gland nut wrench, heat, PB Blaster and the cheater pipe. I also broken my bench vise on this one. The other rear one that I didn't use, I never could get this one to budge even a little. I'll add this as well, the two front ones had been opened before so this probably helped. The rear ones had not been opened. So if you have the original struts on the car it will most likely be a bitch getting them open. Then again, maybe not. It didn't seem like the PB Blaster penetrated in very well. My theory on this is that there is very little room between the nut and the top of the housing to get the penetrating oil in there in the first place and I also think the fine threads have some impact as well. I sprayed mine down several time and let them sit for a few days. It didn't seem like it made much difference.
Once I get it down and aligned I'll have a ride/drive report. I'm expecting a fair improvement at least. I know one of my front ones was going bad. When you jacked the left front off ground and then let it back down, the strut basically stayed expanded and only settled back down once you moved the car. It was also making a hell of a noise over larger imperfections in the road and was starting to bottom out at times. The odd thing was it didn't appear to be leaking when I took it off.
So tonight I got the exhaust finished. I had a weird joint between the mid pipe and the rest of the exhaust. It kind of looked like it should have been used to connect a catalytic converter. It had this really big donut gasket in the joint and it was going bad. I checked around and could not find one that big. On top of everything else,this was the low point of the car and it drug constantly on the speed bumps in the apartment complex I lived in when I first got here. Here's what the joint parts looked like once I sawed this out tonight.
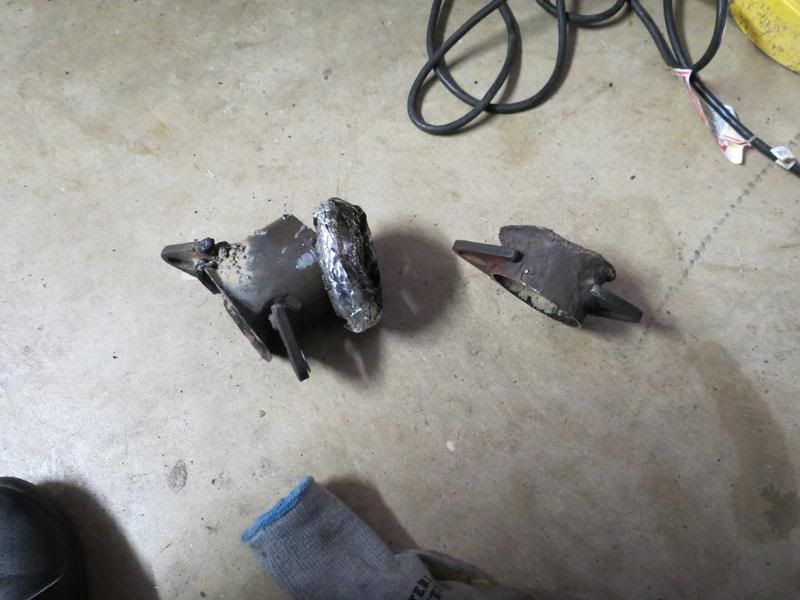
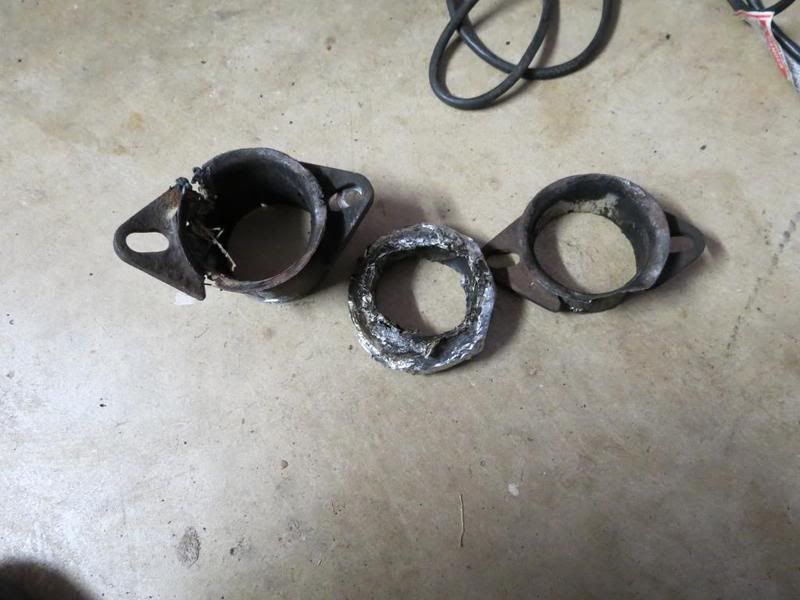
I had pondered for a while on how to fix this joint and had been planning on taking it to an exhaust shop but that was going to require taking the car to the other side of town. Saturday I had an epiphany about what to do. Use a set of 3" exhaust header adapters bolted together. I found what I needed at Summit Racing and got them yesterday. After sawing the other joint out, I welded my new joint in. I got lucky and the adapters slid over the pipes and then I just needed to weld them in.
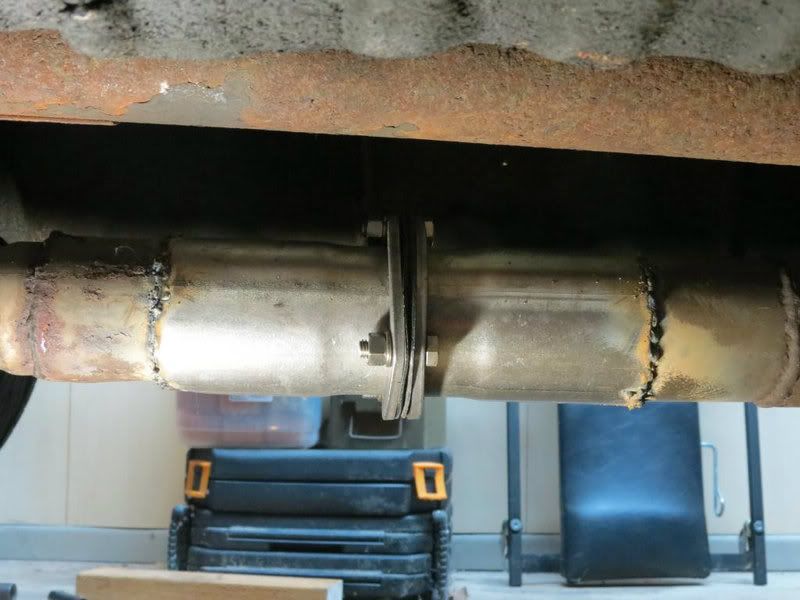
I know my welds probably don't look great but I'm still learning. Prior to the past week, I hadn't done much welding. I'm really enjoying this process of joining metal together with fire.
Any way, now I just have to get the car off the jack stands and tighten the lugs down. After that, off for a four wheel alignment and then a drive to see how the new suspension works. More details to come.
I've been needing to do some suspension upgrades to the car for a while but I've been putting it off. In January of 2011, gtfour77 put a set of Koni RACE series struts up for sale. I talked with Martin about them and he had used on them on the back of his car for part of an autocross season and was going a different route. After talking it over with him, we decided they'd work for what I was wanting to do so I bought them. They came in a set of All Trac rear strut housings that had already been modified for use with the Konis. The only thing was that the spring perches had been cut off for use with coilover sleeves. At the time, I wasn't sure what route I was going to go, use sleeves or swap them into another set of housings with the spring perches. With moving into the new house and getting the wife down here, I put them in the garage cabinet and went on with other things.
Sometime last year I bought a used set of Ground Control coilovers from a member here but wasn't sure about the spring rates so I ended up selling them. This summer, I finally broke down and ordered the Konis for the front of the car. It took a while to get them as they had to special order them from Koni.
Not long after I got them, l0ch0w put up a complete set of struts with Koni inserts and lowering springs for sale. I went ahead and bought these from him with the idea of using the housings with the inserts I already had.
Once I got them, I found some numbers on the springs and tried to identify them. Didn't have a whole lot of luck there but I did find out that these struts had been floating around for a while and it didn't really look like anybody had installed them. So, I went ahead and started tearing them down to install my inserts. The fronts went really well and they had the same Koni insert that I had just purchased in them. I went ahead and installed my new ones. (The ones that I took out are in good shape and I'll be looking to sell these soon.)
The back ones ended up being a different story. I took the gland nut off the top of one like I had with the front ones but to my surprise there was no insert. The actual guts of the strut came out with the oil. The reason this was surprising was that the strut housing were rear All Trac struts that had been converted to use inserts (All Trac rear struts are sealed and to use inserts the top has to be cut off and about 2" from a front strut with the threaded top has to be welded on). I looked at the bottom of the strut and it had the bolt that some Koni inserts use but I've never seen anything like this from Koni. There are a couple of holes in the welds that you could see through and the inserts were yellow and they are adjustable. I tried to get the insert out of the housing but nothing I did would get the insert out. They're in there to stay. So at this point I figured I'd just put oil back in the one I opened and use these on the back. This didn't work. I used fork oil like a lot of people suggest but I never could get the strut to work right.
So, now the plan became to take my rear struts off the car, cut the tops and weld the tops on from the ones I got from gtfour77 and use the original inserts I purchased.
Today, I started my install with the front ones that I had ready to go. The left one went on great. It took about half an hour to get it installed. I did have to use a cheated pipe to break the bolts loose but no problems. I got it put back together and installed the camber bolt kit. It's ready to go. I moved around to the right side and first found that I had forgotten to break the lug nuts loose. I had to lower the car and do this. Once I had the wheel off, I sprayed the bolts down with PB Blaster and waited a while. After this, I found out that the car was too close to the garage wall to use the same piece of pipe I had used before. So, I pulled the top off of my jack handle and used it. I put it on the handle of my rachet and applied pressure. Pop, it sounded like the bolt broke loose. WRONG, I had just suceeded in breaking my rachet that I've had for 30 years. That sucked. So I went and got my breaker bar, snapped the socket on it, put the cheater on it and applied pressure. Pop, the bolt came loose. Wrong again, the damn stud that goes into the socket had sheared off the breaker bar! I've had that thing for 30 years as well but I've probably used it 8 or 10 times in all those years.
So any way, at this point I figured I had better stop for the evening. Tomorrow I'm getting the impact out and that had better break the damn things loose. Once I've got the bolts loose, the right front shouldn't take too long to swap out. I'm just hoping that the rears don't have a ton of surprises. I would like to get this project done and move on to other things.
Well today went better although I did manage to break a Kobalt 1/2 to 3/8 adapter first thing is morning. Sheared right off at the base.
Any way, I found out that my pneumatic impact has weak sauce. I used it on the right front bolts that were giving me grief. I managed to get the top on off with it after using some heat but it wouldn't budge the bottom even after heating the hell out of it. I finally used my 1/2" rachet with the impact socket and a short section of jack handle. I got the right front installed in about an hour and half.
After that I move to the back. I started with the left rear and it came off fairly easy. Once I had it off, I had to tear it down and cut the top off of it. Once that was done and cleaned up, I test fitted the Koni insert to see how much I needed to cut off of the other housing housing and weld onto this one. I had to add an 1 1/2" section to the housing. This all went well. I got it cut and cleaned up pretty easily even though the pipe cutter I got at Harbor Freight is a POS. I also got a chance to tryout the new auto darkening welding helmet I got for Christmas. It worked really well. I was pretty pleased with how the weld job came out as I haven't welded much. It looked pretty good and didn't break when I tighted the gland nut down, so I must have done something half way right.
Once this was done, I put the unit back together with the lowering spring. This went well and I got the strut back on the car although I did manage to drop one of the top mount nuts down between the strut tower and the interior trim. Luckily I found a replacement in my spares box and didn't have to tear the interior apart.
As of now 3 of the 4 struts are changed out. I'm going to try and get the last one done before the wife gets back from WV on Friday. I have to go back to work on Wednesday so I don't know how that will work out.
Got the last strut housing converted, the insert installed and the right rear suspension reinstalled on the car tonight. Just have to tighten the lug nuts, get the car back on the floor and a four wheel alignment and this project is finally done. The struts on rear came off fairly easy and converting the housings wasn't too bad at all. That went a lot better than I had figure. If I had know it would go this well, I would have just converted the housings a month ago and been done with this.
I still have it up on the jack stands. I have a little exhaust work to do so I figured that while it was up in the air I'd get the parts and fix that as well.
As far as installing inserts on the strut housing already made for them (the ones with gland nut already) this can be easy or it can be a complete bitch. I know that doesn't make a lot of sense but I'll explain. The gland nut screws down into the top of the strut housing. It's got about 3/8 to 1/2" of fine threads. It also, more than likely, is round (although the ones on the housings I got from gtfour77 actually looked like nuts on top) and will require either a pipe wrench or the special gland nut wrench. I bought one of the gland nut wrenchs but it didn't really work much better than the pipe wrench.
Any way, you won't really know until you start how hard the gland nut is going to be to get off. One of the four, one of the front housing, came off with just the pipe wrench. The other front one come off with the pipe wrench and a 5 foot cheater pipe on the end of it. One of the rear ones that ended up not using was a complete bitch. It took the pipe wrench, the gland nut wrench, heat, PB Blaster and the cheater pipe. I also broken my bench vise on this one. The other rear one that I didn't use, I never could get this one to budge even a little. I'll add this as well, the two front ones had been opened before so this probably helped. The rear ones had not been opened. So if you have the original struts on the car it will most likely be a bitch getting them open. Then again, maybe not. It didn't seem like the PB Blaster penetrated in very well. My theory on this is that there is very little room between the nut and the top of the housing to get the penetrating oil in there in the first place and I also think the fine threads have some impact as well. I sprayed mine down several time and let them sit for a few days. It didn't seem like it made much difference.
Once I get it down and aligned I'll have a ride/drive report. I'm expecting a fair improvement at least. I know one of my front ones was going bad. When you jacked the left front off ground and then let it back down, the strut basically stayed expanded and only settled back down once you moved the car. It was also making a hell of a noise over larger imperfections in the road and was starting to bottom out at times. The odd thing was it didn't appear to be leaking when I took it off.
So tonight I got the exhaust finished. I had a weird joint between the mid pipe and the rest of the exhaust. It kind of looked like it should have been used to connect a catalytic converter. It had this really big donut gasket in the joint and it was going bad. I checked around and could not find one that big. On top of everything else,this was the low point of the car and it drug constantly on the speed bumps in the apartment complex I lived in when I first got here. Here's what the joint parts looked like once I sawed this out tonight.
I had pondered for a while on how to fix this joint and had been planning on taking it to an exhaust shop but that was going to require taking the car to the other side of town. Saturday I had an epiphany about what to do. Use a set of 3" exhaust header adapters bolted together. I found what I needed at Summit Racing and got them yesterday. After sawing the other joint out, I welded my new joint in. I got lucky and the adapters slid over the pipes and then I just needed to weld them in.
I know my welds probably don't look great but I'm still learning. Prior to the past week, I hadn't done much welding. I'm really enjoying this process of joining metal together with fire.
Any way, now I just have to get the car off the jack stands and tighten the lugs down. After that, off for a four wheel alignment and then a drive to see how the new suspension works. More details to come.
Nitro_Alltrac
New member
I hadn't gotten around to posting any pics of the car after the new suspension was installed. In addition, I painted my wheels. I've never been really happy with the look of the Konig wheels. I didn't like the "chrome " sections. In addition to that, everybody and his uncle here in San Antonio has these damn wheels.
Here is what the car looked like originally.

Here's what it looks like now with the new suspension and the wheels painted.


It may not show up well in the photos, but I painted the wheels metallic charcoal gray and put a coat of clear on them. They are pretty glossy. I'm pretty happy with the results. I may have to do some painting on the center cap so I have a little contrast. The looked I've got on the All Trac now is similar to what the wheels look like on my IS 350 Fsport.
Here is what the car looked like originally.
Here's what it looks like now with the new suspension and the wheels painted.
It may not show up well in the photos, but I painted the wheels metallic charcoal gray and put a coat of clear on them. They are pretty glossy. I'm pretty happy with the results. I may have to do some painting on the center cap so I have a little contrast. The looked I've got on the All Trac now is similar to what the wheels look like on my IS 350 Fsport.
Nitro_Alltrac
New member
Been a while. After the move and winter setting in, didn't have a chance to do much with no garage. I have changed out the downpipe. The old one cracked and I had tried to fix it but it didn't hold. When I got it off, it was much worse than I thought. No wonder I was getting exhaust fumes in the cockpit. I replaced it with a Berk stainless downpipe. Very nice piece of work and went in without a hitch. I do think it positions the midpipe slightly differently than the old one. I've a got a rattle now that I didn't have before. I'm pretty sure it's where the pipe goes over the crossmember. I've adjusted it a couple times not but positive results. I think I'm going to have to take it to the exhaust shop and get them to take a look. Here's the old pipe and the new one.

Here's the crack in the old one.

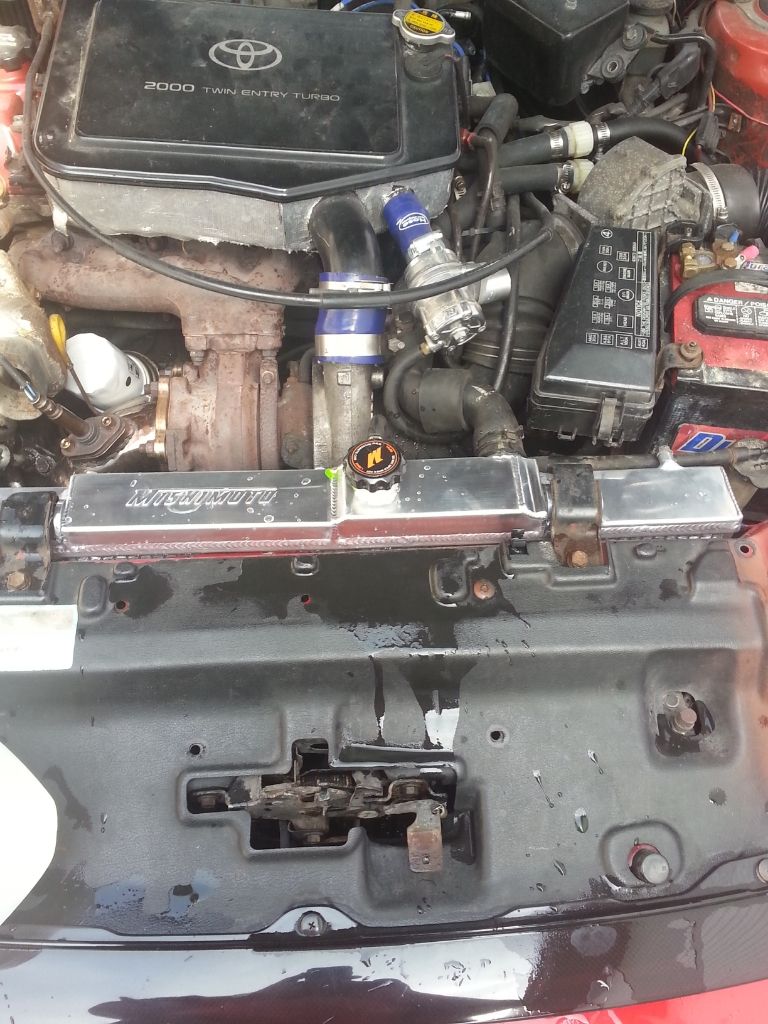
I have also had a coolant loss issue since moving the car back from Texas. I don't know if it was coincidence or if the moving company did something. They did break the grill and the hood trim but I could find any direct evidence of further damage. Anyway, I thought at first it was the head gasket and after checking everything out, that seemed to not be the issue. I kept looking but couldn't really find anything. I put dye in the radiator and ran that for a while. I finally notice that there was coolant showing up in the channel at the bottom of the radiator between the core and the tank. I got a pressure tester and tested the radiator and sure enough, a couple leaks. I thought about getting it repaired but decided to go with a Mishimoto aluminum replacement. I have to say that when they say it is direct drop in, they mean it. It actually fits better than the one I took out. It has all of the mount points for all of the stock accessories. I could have even used my stock fan but I replaced that with a 12" slimline. So far, everything is working great. Here's the radiator mounted. I realized when I was done that I should have taken more pictures.
Here's the crack in the old one.
I have also had a coolant loss issue since moving the car back from Texas. I don't know if it was coincidence or if the moving company did something. They did break the grill and the hood trim but I could find any direct evidence of further damage. Anyway, I thought at first it was the head gasket and after checking everything out, that seemed to not be the issue. I kept looking but couldn't really find anything. I put dye in the radiator and ran that for a while. I finally notice that there was coolant showing up in the channel at the bottom of the radiator between the core and the tank. I got a pressure tester and tested the radiator and sure enough, a couple leaks. I thought about getting it repaired but decided to go with a Mishimoto aluminum replacement. I have to say that when they say it is direct drop in, they mean it. It actually fits better than the one I took out. It has all of the mount points for all of the stock accessories. I could have even used my stock fan but I replaced that with a 12" slimline. So far, everything is working great. Here's the radiator mounted. I realized when I was done that I should have taken more pictures.

Nitro_Alltrac
New member
Time to update this thread while I'm off this week.
The coolant leak showed back up a month or so after putting the new radiator in. Kept looking around for where it was coming from.
Fired the car up and got it to operating temp and varied the engine speed up and down for a bit. Right after I shut it down I jumped out and looked. Coolant was almost streaming down underneath. It was coming down over the front of the oil pan. It also looked like there was some coolant on the block between the oil cooler and the back of the water pump housing. Since the coolant was coming down over the front of the oil pan, about two inches from the passenger side from corner, I thought I've got a by pass hose leaking. The wonder HFH on earth.
I pulled the alternator off and got the thermostat housing off so I can hopefully get to both ends of the hose. This may not be it but I would think if the pump as starting to weep it would be coming down over the side of the pump.
Well, I think I found my leak.
Ordered the new hose so I thought I'd see if I could get the old one off. Took all work after removing the alternator, the AC line, the oil filter and the thermostat housing. I'm pretty confident that Toyota hired the engineering department at GM to design this set up. I don't think the Japanese could come up with such an asinine set up by themselves. It really looks like something from GM.
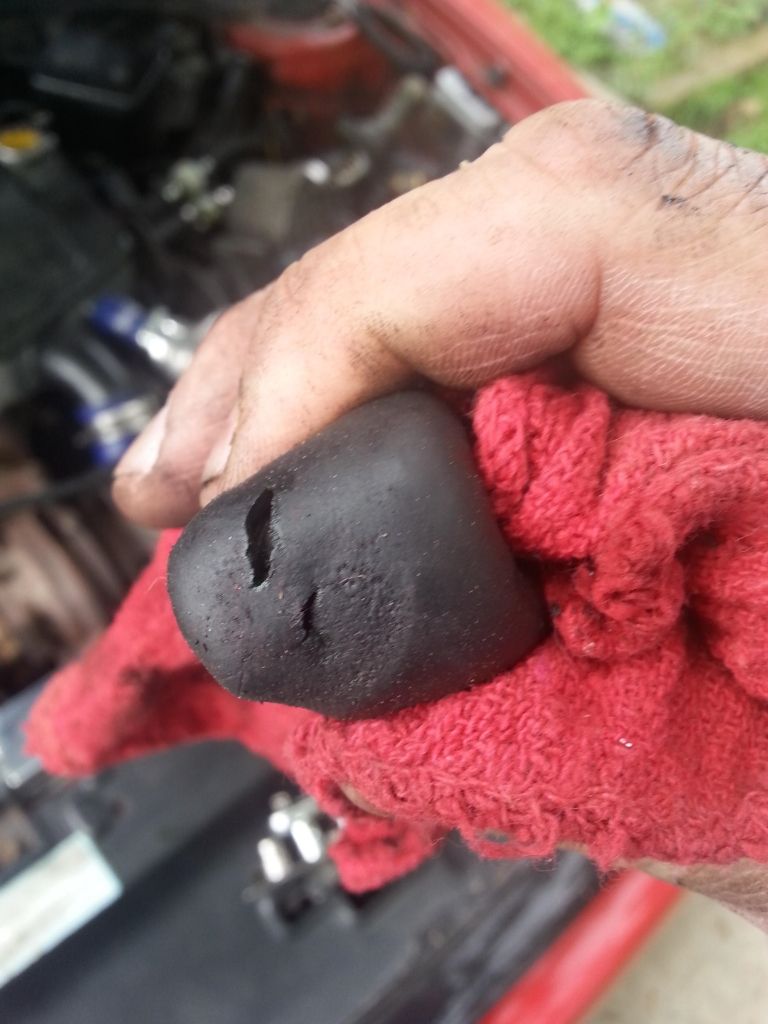
Anyway, from the looks of this hose, this has to be this particular leak. Hopefully the hose comes in tomorrow and I can get it on Saturday morning without too much trouble and be back on the road. Wish me luck. It think I'm going to need it.
I have to say that after taking the alternator and oil filter it is possible to get to it. I may have a different story trying to put it back on. This one came off the pipes easier that the HFH BUT it isn't exposed to nearly as much heat. I picked the new one up today so hopefully I can get it on this weekend depending on the weather. We're still getting rain off and on but thankfully we haven't gotten nearly as much as some of the surrounding areas and we didn't have the tornados.
OK, got the hose on and everything put back together. Filled the radiator and ran it till it got hot. So far, no leak. I'll take it out and drive it tomorrow.
So now, here are a few pics of this fun process. It actually wasn't as bad as I thought it might be.
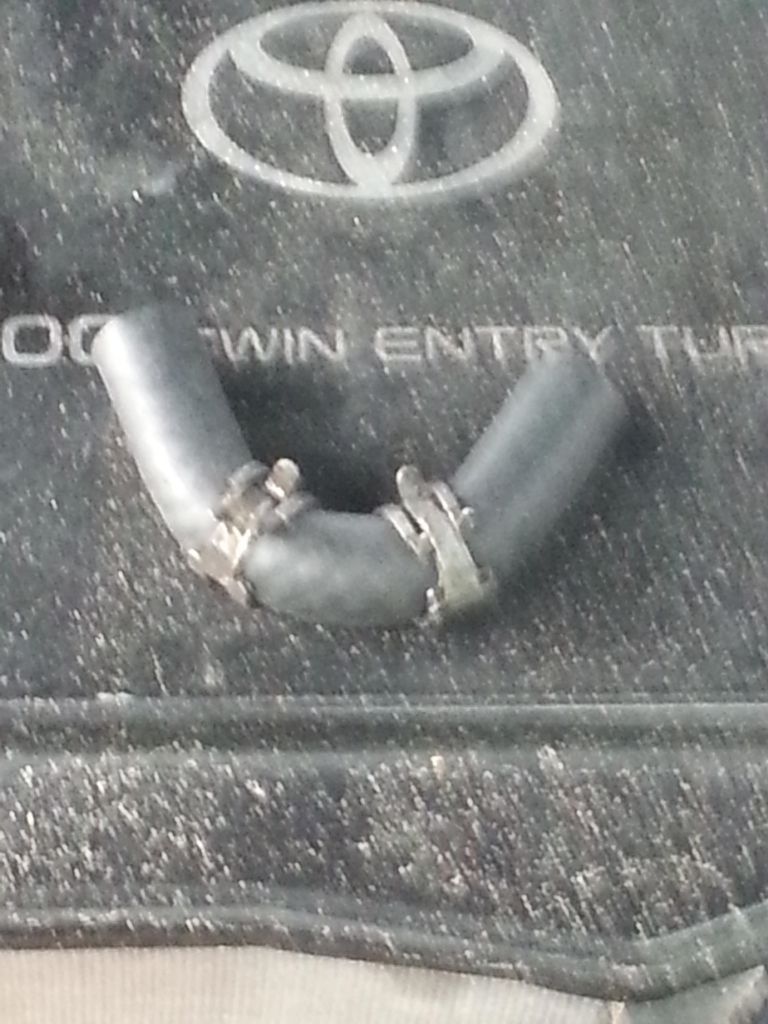
Here's the new hose. It's much more solid feeling than the old one. It's hard to tell how old the one that came off was, probably original. This engine is a JDM unit that was swapped in two owners ago. It's got about 130K on it (I found the Japanese receipt from the vehicle it was pulled out of. Only had 19K when it came out.)
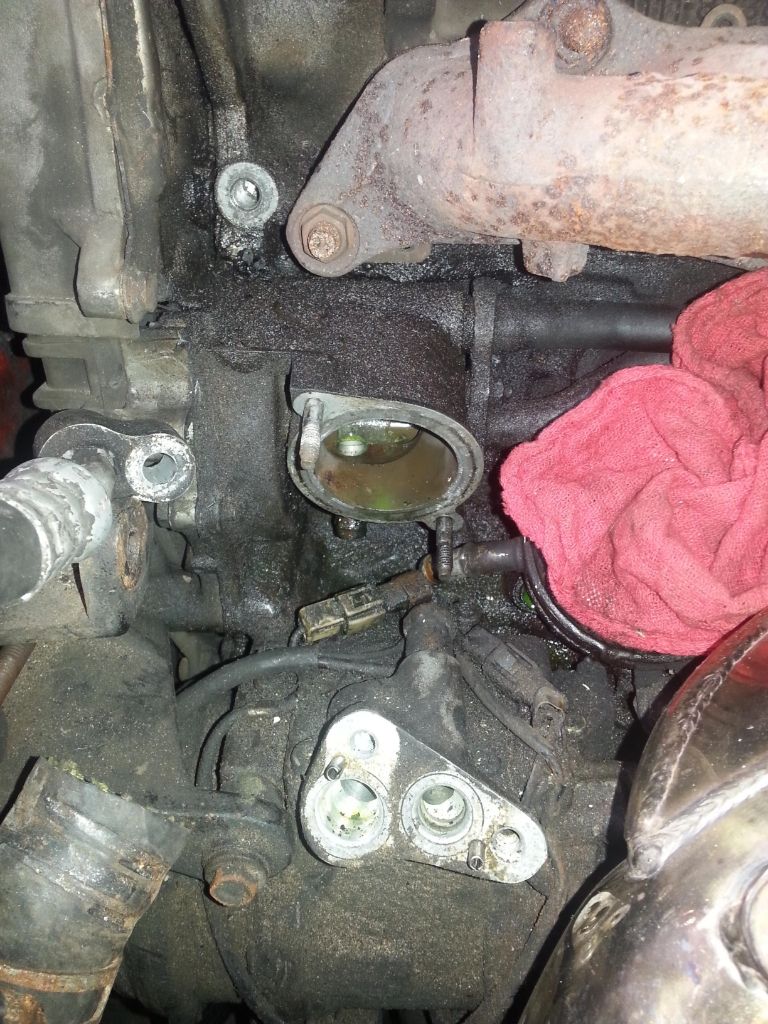
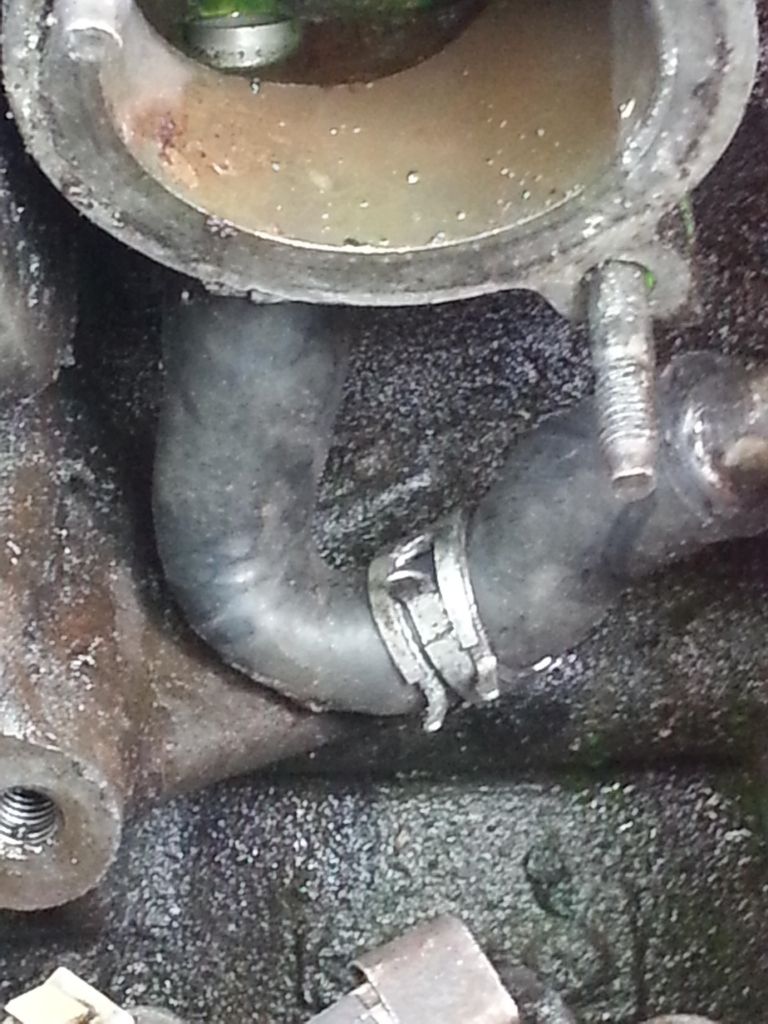
Here's where the hose goes back into. It doesn't look that bad with the front corner of the engine taken off.
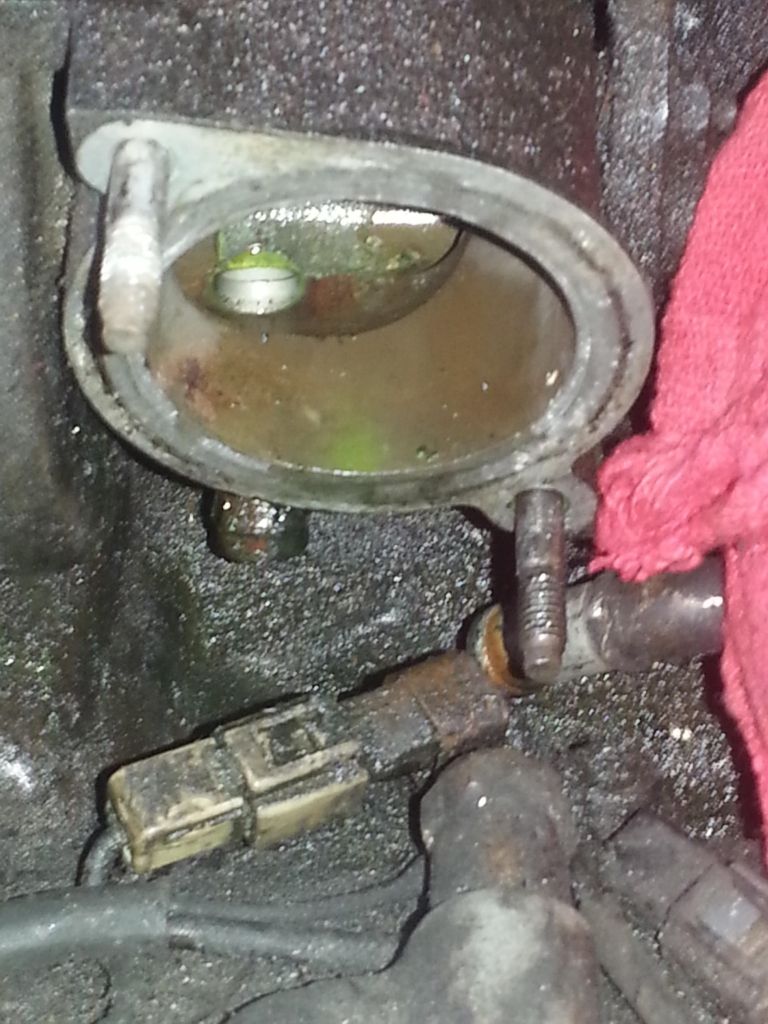
Here's a close up. The ends of the two pipes are about 1/2" to 3/4" apart. It's pretty tight in there.
Here's the new hose installed and the second clamp getting ready to go into place.
Hopefully this takes care of things for a while. I think the only other hose that should probably be replace are one of the heater lines (I had one spring a leak while I was in the Hill Country in Texas at night. Big fun) and that water by pass hose on the back. I'm going to do those soon so that is one less thing to worry about.
Oh, and DEGREASE the freakin engine.
It wasn't as bad as some have written. The thing with these two by pass hose (HFH and HFHOE) is that there is no quick easy way to change them out. You have to disassemble a good part of the front of the engine to get down to them. It's not an easy job but one that you can do if you've got some mechanical skills and have done some wrenching before.
Personally I would have rather liked Toyota to have run threaded hard lines into the oil cooler. I know that they used the rubber for service purposes but it makes for a weak link. I don't know about others, but the only time in 8 years that I've had the oil cooler/filter base loose is when I did the Berk downpipe.
The coolant leak showed back up a month or so after putting the new radiator in. Kept looking around for where it was coming from.
Fired the car up and got it to operating temp and varied the engine speed up and down for a bit. Right after I shut it down I jumped out and looked. Coolant was almost streaming down underneath. It was coming down over the front of the oil pan. It also looked like there was some coolant on the block between the oil cooler and the back of the water pump housing. Since the coolant was coming down over the front of the oil pan, about two inches from the passenger side from corner, I thought I've got a by pass hose leaking. The wonder HFH on earth.
I pulled the alternator off and got the thermostat housing off so I can hopefully get to both ends of the hose. This may not be it but I would think if the pump as starting to weep it would be coming down over the side of the pump.
Well, I think I found my leak.

Ordered the new hose so I thought I'd see if I could get the old one off. Took all work after removing the alternator, the AC line, the oil filter and the thermostat housing. I'm pretty confident that Toyota hired the engineering department at GM to design this set up. I don't think the Japanese could come up with such an asinine set up by themselves. It really looks like something from GM.
Anyway, from the looks of this hose, this has to be this particular leak. Hopefully the hose comes in tomorrow and I can get it on Saturday morning without too much trouble and be back on the road. Wish me luck. It think I'm going to need it.
I have to say that after taking the alternator and oil filter it is possible to get to it. I may have a different story trying to put it back on. This one came off the pipes easier that the HFH BUT it isn't exposed to nearly as much heat. I picked the new one up today so hopefully I can get it on this weekend depending on the weather. We're still getting rain off and on but thankfully we haven't gotten nearly as much as some of the surrounding areas and we didn't have the tornados.
OK, got the hose on and everything put back together. Filled the radiator and ran it till it got hot. So far, no leak. I'll take it out and drive it tomorrow.
So now, here are a few pics of this fun process. It actually wasn't as bad as I thought it might be.
Here's the new hose. It's much more solid feeling than the old one. It's hard to tell how old the one that came off was, probably original. This engine is a JDM unit that was swapped in two owners ago. It's got about 130K on it (I found the Japanese receipt from the vehicle it was pulled out of. Only had 19K when it came out.)

Here's where the hose goes back into. It doesn't look that bad with the front corner of the engine taken off.

Here's a close up. The ends of the two pipes are about 1/2" to 3/4" apart. It's pretty tight in there.

Here's the new hose installed and the second clamp getting ready to go into place.

Hopefully this takes care of things for a while. I think the only other hose that should probably be replace are one of the heater lines (I had one spring a leak while I was in the Hill Country in Texas at night. Big fun) and that water by pass hose on the back. I'm going to do those soon so that is one less thing to worry about.
Oh, and DEGREASE the freakin engine.
It wasn't as bad as some have written. The thing with these two by pass hose (HFH and HFHOE) is that there is no quick easy way to change them out. You have to disassemble a good part of the front of the engine to get down to them. It's not an easy job but one that you can do if you've got some mechanical skills and have done some wrenching before.
Personally I would have rather liked Toyota to have run threaded hard lines into the oil cooler. I know that they used the rubber for service purposes but it makes for a weak link. I don't know about others, but the only time in 8 years that I've had the oil cooler/filter base loose is when I did the Berk downpipe.
Nitro_Alltrac
New member
2nd to 3rd gen 3SGTE electronics conversion
I've been gathering parts for over a year now and I'm ready to start the process. I've been following Luni's write up over at MR2OC about how to go about this.
http://www.mr2oc.com/showthread.php?t=292842&highlight=gen3+electronics+conversion
There is a lot of go information about what you need and how to go about doing this in his thread along with another thread that is linked to his. It doesn't appear to be that difficult with Berk conversion harness that out there due to Luni's work.
I've got that and a 205 ECU that I got from lalojamesliz. He also hooked me up with the cold start injector plate that allows for the MAT to be installed in place of the CSI. I picked up the injectors from spitfiremk16. Thanks to the great Pic n Pulls in San Antonio I got the igniter, the AFM plug, the IAT. I've made the harnesses for the MAT and IAT and they're ready to go. I've made an adapter harness to adjust the voltages so I can use the gen2 map sensor for now. Here's a link to a thread at MR2OC on how to do this for either a GM 2bar MAP sensor or to adapt the existing 2nd gen.
http://www.mr2oc.com/showthread.php?t=461736
I know that this isn't ideal but I don't want to put out $120-150 bucks for a 3rd gen right now. I've been looking trying to find a decent deal on one in Europe but so far no luck. Based on that thread and few other things I've find this should work for now.
So, the weather is supposed to be good tomorrow. I've got the day off and I'm going to start tomorrow morning. I'm going to try to take pictures as I go and post my experiences up. Changing the injectors is supposed to be about the worst part.
Made progress today. I finished what little wiring I had left. I got the 540 injectors ready to install and then worked on getting the 2nd gen fuel rail and injectors out. This took about 3.5 hours. Finally got it out. It was a pain in the ass. Also got the cold start injector out. I cleaned up the fuel rail and took out the old injectors. This was where I ran into trouble. Somebody had been in there before (I could tell before this as some of the OEM clamps had been replaced with worm clamps). Some how they had cracked the bottom of one of the injector holders (could have been a manufacturing defect I guess, but anyway, when I pulled the insulator off to put the new one on there was a chunk of aluminum was gone. I double checked to make sure that I didn't mess it up but there were no pieces laying around so it's been like that for a good while.
OK, an update on something other than the fuel rail fiasco.
In billion percent humidity (I love WV in the summer time) and between rain showers, I actually got a little bit done this evening. I swapped out the igniter. I used a 5S unit with the 175 on top. It is more or less a straight swap. It does require just a little modification for the stock plug to fit. Looking at the connector on the igniter, on the left side there is a hump (for lack of a better term) that is too big to allow the harness connector to slide all the way into place. It's about twice the size of the one on the right side Take a pocket knife, Xacto, Dremel or what ever and remove this hump. (I've got extra igniters so I'll try to get a picture illustrating this hump.) It's pretty easy to get off. Once that is done, the plug goes straight on. From here, straight bolt on to the bracket on the firewall.
I got the MAT installed in the place of the cold start injector. I used the adapter plate that I had gotten from lalojamesliz. Worked great. The plate is a straight bolt in. I did have to retap the sensor hole. I used the GM sensor with has a 3/8-18 NPT nut. I'm guessing that the adapter plate was originally tapped for a Toyota MAT. The threads were off enough that the GM sensor wouldn't go in.
I also go the harness run to the sensor and got it hooked up. I pulled the AFM out and have my MAT/IAT adapter harness hooked up. I have to get something to hook my intake hoses back together. (I have the battery mounted in the stock location so no straight intake.) Once I get the adapter piece in place I'll install the IAT. This will also give me a place to install a barb and recycle my blow off valve.
Next step after this, when I'm not swimming outside, will be to install the 205 ECU. I've got the Berk harness so this should be plug and play. The only thing I'm concerned about since this is a 205 ECU, am I going to get the Code 54 for the intercooler water level/intercooler pump? There shouldn't be anything in the harness to feed into that pin on the ECU. I looked at the pinouts and that part should be OK. I wondering though that if even nothing is hooked to that pin, will the ECU through the code? On the 205 swaps that don't use the WTA but have the 205 harness, the easy way around this is to jump the two pins. Since I'm on the 185 harness there is nothing to modify. All of the 3rd gen electronics conversions that I've found detail info on so far have used the MR2 ECU, so this is not a problem. Anybody have any idea if this is going to be a problem and if so, any ideas on how to get around it? I have the 205 WTA intercooler but I really don't want to have to figure out how to wire that float in or figure out how to wire the pump so that the ECU sees it.
More updates to follow.
OK, I've been going through some more documentation I've found and I think I've found way around the code 54 for the intercooler water level sensor.
The common fix give for the water level sensor error for a car with the 205 harness but using a FMIC is to jump the two pins in the water level sensor plug. But in my case since I'm on the 185 harness there's no plug. There's my conundrum. So, looking in the Celicatech BGB section, there is a 3SGTE supplement repair manual for the 94 model. It gives the test procedure at the ECU for this sensor and the state at the plug depending on if the float is up or down. If the float is up, it should have continuity. If it's down, no continuity. I also found the wiring diagram that shows the wiring from the water level sensor to the ECU. It's a simple circuit, one wire goes to the LEV pin on the ECU and the other side goes to a body ground. Here's the diagram. The water level sensor pin, LEV and sensor are in the bottom right corner.

Based on this and what the 205 owners say they do to get around the code 54 when going to a FMIC, I'm thinking I should be able to just ground the LEV pin and that should show continuity on the circuit. By putting a jumper in the plug on the 205 harness all they are doing is hooking the LEV pin to the ground on the other wire. I'm thinking this should work.
Alltracman78 posted info about the issue with intercooler pump and the ECU. His post has the web address for a GT4 site (http://www.gt4dc.co.uk) in the UK and I checked it out as well. They have some good info there and even had some pictures of what they were doing with wiring on the 205 harness to get around this. Based on the diagram this diagram, I'm just going to make a small circuit with the resistors as shown and wire everything into the correct pins. This should cure that issue.

Talking further with Alltracman78, I found that you can ground the LEV pin to the body and this should take care of that part of the code 54 problem.
Also, here's a diagram I found that decodes most of the 205 pins. Thought this might be of help to someone doing something similar.

Time for an update.
I'm getting close. I finished making up the wiring that I needed over the weekend. I had to get the adapter harness put together to get around the code 54 intercooler issue with the 205 ECU. Thanks to Alltracman I think I've got all of that worked out. The post that Jeremy put up with the diagram is the way around that. I made a harness that I spliced into the Berk harness. That went fine.
A couple of things about the Berk harness. It makes this a simple process for the 90-91 wiring (I have a 90-91 JDM ECU so I had already repined the harness previously. With the stock 92-93, I really think it would be easy and cheaper to repin the plugs. They are pretty close to the 205 setup). First, on the one I got the FC pin on the 205 side was in the wrong place. It was in the spot for the intercooler water level sensor, LEV. Easy enough to fix by moving the pin but if I hadn't checked the harness this would have been a major pain. This may just have been a mistake on the one that I got but if you use the harness be sure to check that. Second, unlike the harness that Luni got, the wiring for the MAT and IAT are labeled and there on the 205 side but the are just cut wires and not connected to the VS and THA spots on the 185 side. Not a big deal but I was under the impression that they would be connected. Third the wire for the M+ pin is wired into the E2 pin. Not an issue if using the MR2 ECU but for the 205 this wire/pin is needed for the code 54 fix. Once again, not a big deal but something to be aware of if doing this conversion with the 205 ECU.
I've got the ECU in, the harness hooked up to it and the extra wiring under the dash finished. I also got the converter harness for the gen2 MAP installed. The only things left are getting the connector pipe into the intake hoses and putting the IAT into that and getting the fuel rail put together with the 540 injectors and installed. I want to thank ChrisD and Luni for helping me out with the fuel rail issue. Luni hooked me up with a good stock one and ChrisD made me a hell of a deal on a WolfKatz. Once that's put together and installed I'll be ready to try to fire it up.
I got the fuel rail all put back together. It's ready to go back in now. I've also got my AFM replacement pipe done and ready to finish installing. The recovery from the sinus surgery, while not as bad as I thought it might be is taking more than I thought it would. Hopefully I can get this back together while I'm off this week.
I've been gathering parts for over a year now and I'm ready to start the process. I've been following Luni's write up over at MR2OC about how to go about this.
http://www.mr2oc.com/showthread.php?t=292842&highlight=gen3+electronics+conversion
There is a lot of go information about what you need and how to go about doing this in his thread along with another thread that is linked to his. It doesn't appear to be that difficult with Berk conversion harness that out there due to Luni's work.
I've got that and a 205 ECU that I got from lalojamesliz. He also hooked me up with the cold start injector plate that allows for the MAT to be installed in place of the CSI. I picked up the injectors from spitfiremk16. Thanks to the great Pic n Pulls in San Antonio I got the igniter, the AFM plug, the IAT. I've made the harnesses for the MAT and IAT and they're ready to go. I've made an adapter harness to adjust the voltages so I can use the gen2 map sensor for now. Here's a link to a thread at MR2OC on how to do this for either a GM 2bar MAP sensor or to adapt the existing 2nd gen.
http://www.mr2oc.com/showthread.php?t=461736
I know that this isn't ideal but I don't want to put out $120-150 bucks for a 3rd gen right now. I've been looking trying to find a decent deal on one in Europe but so far no luck. Based on that thread and few other things I've find this should work for now.
So, the weather is supposed to be good tomorrow. I've got the day off and I'm going to start tomorrow morning. I'm going to try to take pictures as I go and post my experiences up. Changing the injectors is supposed to be about the worst part.
Made progress today. I finished what little wiring I had left. I got the 540 injectors ready to install and then worked on getting the 2nd gen fuel rail and injectors out. This took about 3.5 hours. Finally got it out. It was a pain in the ass. Also got the cold start injector out. I cleaned up the fuel rail and took out the old injectors. This was where I ran into trouble. Somebody had been in there before (I could tell before this as some of the OEM clamps had been replaced with worm clamps). Some how they had cracked the bottom of one of the injector holders (could have been a manufacturing defect I guess, but anyway, when I pulled the insulator off to put the new one on there was a chunk of aluminum was gone. I double checked to make sure that I didn't mess it up but there were no pieces laying around so it's been like that for a good while.
OK, an update on something other than the fuel rail fiasco.
In billion percent humidity (I love WV in the summer time) and between rain showers, I actually got a little bit done this evening. I swapped out the igniter. I used a 5S unit with the 175 on top. It is more or less a straight swap. It does require just a little modification for the stock plug to fit. Looking at the connector on the igniter, on the left side there is a hump (for lack of a better term) that is too big to allow the harness connector to slide all the way into place. It's about twice the size of the one on the right side Take a pocket knife, Xacto, Dremel or what ever and remove this hump. (I've got extra igniters so I'll try to get a picture illustrating this hump.) It's pretty easy to get off. Once that is done, the plug goes straight on. From here, straight bolt on to the bracket on the firewall.
I got the MAT installed in the place of the cold start injector. I used the adapter plate that I had gotten from lalojamesliz. Worked great. The plate is a straight bolt in. I did have to retap the sensor hole. I used the GM sensor with has a 3/8-18 NPT nut. I'm guessing that the adapter plate was originally tapped for a Toyota MAT. The threads were off enough that the GM sensor wouldn't go in.
I also go the harness run to the sensor and got it hooked up. I pulled the AFM out and have my MAT/IAT adapter harness hooked up. I have to get something to hook my intake hoses back together. (I have the battery mounted in the stock location so no straight intake.) Once I get the adapter piece in place I'll install the IAT. This will also give me a place to install a barb and recycle my blow off valve.
Next step after this, when I'm not swimming outside, will be to install the 205 ECU. I've got the Berk harness so this should be plug and play. The only thing I'm concerned about since this is a 205 ECU, am I going to get the Code 54 for the intercooler water level/intercooler pump? There shouldn't be anything in the harness to feed into that pin on the ECU. I looked at the pinouts and that part should be OK. I wondering though that if even nothing is hooked to that pin, will the ECU through the code? On the 205 swaps that don't use the WTA but have the 205 harness, the easy way around this is to jump the two pins. Since I'm on the 185 harness there is nothing to modify. All of the 3rd gen electronics conversions that I've found detail info on so far have used the MR2 ECU, so this is not a problem. Anybody have any idea if this is going to be a problem and if so, any ideas on how to get around it? I have the 205 WTA intercooler but I really don't want to have to figure out how to wire that float in or figure out how to wire the pump so that the ECU sees it.
More updates to follow.
OK, I've been going through some more documentation I've found and I think I've found way around the code 54 for the intercooler water level sensor.
The common fix give for the water level sensor error for a car with the 205 harness but using a FMIC is to jump the two pins in the water level sensor plug. But in my case since I'm on the 185 harness there's no plug. There's my conundrum. So, looking in the Celicatech BGB section, there is a 3SGTE supplement repair manual for the 94 model. It gives the test procedure at the ECU for this sensor and the state at the plug depending on if the float is up or down. If the float is up, it should have continuity. If it's down, no continuity. I also found the wiring diagram that shows the wiring from the water level sensor to the ECU. It's a simple circuit, one wire goes to the LEV pin on the ECU and the other side goes to a body ground. Here's the diagram. The water level sensor pin, LEV and sensor are in the bottom right corner.
Based on this and what the 205 owners say they do to get around the code 54 when going to a FMIC, I'm thinking I should be able to just ground the LEV pin and that should show continuity on the circuit. By putting a jumper in the plug on the 205 harness all they are doing is hooking the LEV pin to the ground on the other wire. I'm thinking this should work.
Alltracman78 posted info about the issue with intercooler pump and the ECU. His post has the web address for a GT4 site (http://www.gt4dc.co.uk) in the UK and I checked it out as well. They have some good info there and even had some pictures of what they were doing with wiring on the 205 harness to get around this. Based on the diagram this diagram, I'm just going to make a small circuit with the resistors as shown and wire everything into the correct pins. This should cure that issue.
Talking further with Alltracman78, I found that you can ground the LEV pin to the body and this should take care of that part of the code 54 problem.
Also, here's a diagram I found that decodes most of the 205 pins. Thought this might be of help to someone doing something similar.
Time for an update.
I'm getting close. I finished making up the wiring that I needed over the weekend. I had to get the adapter harness put together to get around the code 54 intercooler issue with the 205 ECU. Thanks to Alltracman I think I've got all of that worked out. The post that Jeremy put up with the diagram is the way around that. I made a harness that I spliced into the Berk harness. That went fine.
A couple of things about the Berk harness. It makes this a simple process for the 90-91 wiring (I have a 90-91 JDM ECU so I had already repined the harness previously. With the stock 92-93, I really think it would be easy and cheaper to repin the plugs. They are pretty close to the 205 setup). First, on the one I got the FC pin on the 205 side was in the wrong place. It was in the spot for the intercooler water level sensor, LEV. Easy enough to fix by moving the pin but if I hadn't checked the harness this would have been a major pain. This may just have been a mistake on the one that I got but if you use the harness be sure to check that. Second, unlike the harness that Luni got, the wiring for the MAT and IAT are labeled and there on the 205 side but the are just cut wires and not connected to the VS and THA spots on the 185 side. Not a big deal but I was under the impression that they would be connected. Third the wire for the M+ pin is wired into the E2 pin. Not an issue if using the MR2 ECU but for the 205 this wire/pin is needed for the code 54 fix. Once again, not a big deal but something to be aware of if doing this conversion with the 205 ECU.
I've got the ECU in, the harness hooked up to it and the extra wiring under the dash finished. I also got the converter harness for the gen2 MAP installed. The only things left are getting the connector pipe into the intake hoses and putting the IAT into that and getting the fuel rail put together with the 540 injectors and installed. I want to thank ChrisD and Luni for helping me out with the fuel rail issue. Luni hooked me up with a good stock one and ChrisD made me a hell of a deal on a WolfKatz. Once that's put together and installed I'll be ready to try to fire it up.
I got the fuel rail all put back together. It's ready to go back in now. I've also got my AFM replacement pipe done and ready to finish installing. The recovery from the sinus surgery, while not as bad as I thought it might be is taking more than I thought it would. Hopefully I can get this back together while I'm off this week.