You are using an out of date browser. It may not display this or other websites correctly.
You should upgrade or use an alternative browser.
You should upgrade or use an alternative browser.
1026 GT-Four Normal Body
- Thread starter Corey
- Start date
darthripley
Moderator
i personally like the stock bumper.
the only real reason to go to a CS/RC imho is if you plan on going with a nice big FMIC.
the CS/RC bumper just looks too blank/empty w/o a FMIC peeking out.
you ought to get a set of car ramps that you drive the car up onto to be able to work on it.
we put the MR2's front on the ramps & had the rear on jackstands, then used the hoist to pull the ass of the MR2 up in the air to allow us to roll the engine/tranny out on a heavy duty mover's dolly.
the ramps come in handy for oil changes & any other work too & are about $30 bux or so at wal-mart or autozone.
have fun!
Yep, i have ramps. But they are kindof narrow for my tires now since i got the new wheels. These blocks of wood are about 8 inches thick, so its pretty stable. ")
If i were to get the RC, id be sure to get the proper grates to fill in all the holes, so it doesnt look so open, and to protect my rad... but having discovered the sheer size of my A/C rad, i guess that does a pretty good job of it too lol.
If i were to get the RC, id be sure to get the proper grates to fill in all the holes, so it doesnt look so open, and to protect my rad... but having discovered the sheer size of my A/C rad, i guess that does a pretty good job of it too lol.
^^ thank you
Well, Night # 3. Total time so far. ~ 14 Hours
Tonight i finished with the wiring harness, the shift cables, heater hoses, Charcol Canister (i think im going to delete it), the fuel lines, and i removed the entire prop shaft.... very heavy if you do it by your self... which i did. Suggest using jack stands to rest portions of the shaft onto once the bolts are removed.
First I undid the 4 bolts that hook it up to the diff (then left one in for support), then removed the bolts holding the two mid-car brackets in place, then by lowering the middle down, i could pull the front of the shaft out of the tranny.
then i used a small crow bar to spearate the diff end of the shaft.
All thats left are the Electric speed sensor clip (cant seem to get it off), the PS pump, and the A/C. I pretty much mutalated the AC connector trying to separate it from the harness. oh well, still intact, just cracked up a bit. that thing took me 20 minutes alone.
For re-assembly, ill be putting di-electric grease onto all the connector pins, and some MP grease on the rest of the plug to make removal in the future easier.
Ill get some pics up tomorrow. Not much different from the pics of last night, most noticable thing is that the drive shaft is out lol.
I also went to Canadian Tire and Borrowed a Univeral Clutch alignment tool, and a pulley remover. (to hold it while removing the bolts)
All for free, just need to give them your CC number. Canadian tire FTW
So, gunning for engine on the floor by tomorrow.
Something i realized.... I wont be able to use my stock fogs with my new bumper anyway, theres no where for them to mount up as far as i can tell
Guess i might as well get the RC bumper. but that will have to wait. i guess i should get a boost gauge/controller first.
BriinumsBo
New member
bonzi racing rear diff brace ? what is that?
get a boost gauge. i paid ~3k for engine rebuild because i didnt know i was overboosting because of torn pressure line.. when i got the gauge the main bearings were already on their way to heaven..
get a boost gauge. i paid ~3k for engine rebuild because i didnt know i was overboosting because of torn pressure line.. when i got the gauge the main bearings were already on their way to heaven..
bonzi racing rear diff brace ? what is that?
Its that red metal piece in one of Ben's parts pics - sitting on the counter.
It bolts up to the body and rear diff to hold it - because he told me the stock RX7 has wicked wheel hop if you take a tight corner on power.
The RX7 rear diff is fairly wobbly stock (hung by exhaust hangers kindof i beleive) so this brace keeps it nice and steady.
I'll go get a gauge then lol
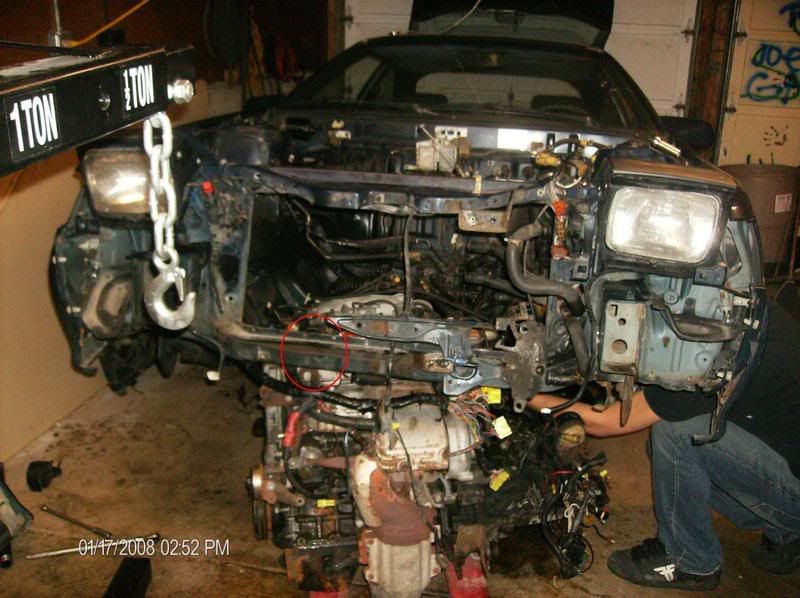
Night #4: Total Time ~20 hours
Today Ben came over, and we disconnected the drive shafts, the x2 powersteering lines - leaving the pump attached to the engine, and the resevoir attached to the body. Before removing the lines, i used a fuel hand pump to suck the fluid out of the resevoir
Then unbolted and tied off the A/C - which actually had to wait till the engine was out of the mounts so we could shift it to the right for clearance to pull the pump up and out.
Also had to remove the thermostant coolant neck so the A/C pump could be lifted out. but that okay because im replacing it anyway.
Then removed tranny cooller.
Ill post pics tomorrow. But the engine is on the ground Now we just need to figure out how to get it out from under the car.... right now its blocked up on a sheet of plywood, which is sitting on metal bars to roll it.
Problem is, the legs of our engine hoist get in the way of moving the engine out from under the car once we hook up to the bumper.
Any ideas?
Thanks
Corey
Today Ben came over, and we disconnected the drive shafts, the x2 powersteering lines - leaving the pump attached to the engine, and the resevoir attached to the body. Before removing the lines, i used a fuel hand pump to suck the fluid out of the resevoir
Then unbolted and tied off the A/C - which actually had to wait till the engine was out of the mounts so we could shift it to the right for clearance to pull the pump up and out.
Also had to remove the thermostant coolant neck so the A/C pump could be lifted out. but that okay because im replacing it anyway.
Then removed tranny cooller.
Ill post pics tomorrow. But the engine is on the ground
Now we just need to figure out how to get it out from under the car.... right now its blocked up on a sheet of plywood, which is sitting on metal bars to roll it.Problem is, the legs of our engine hoist get in the way of moving the engine out from under the car once we hook up to the bumper.
Any ideas?
Thanks
Corey
Denver_whiteST185
New member
i made myself a little cart/dolly out of supplies at a hardware store, and then placed the hoist on the drivers side, and then hawled it out on the passenger side.
it wasn't easy to say the least....
it wasn't easy to say the least....
What is the minimum setting you guys think i could set that hoist to?
The longer the better. ive got 2, 1.5, 1, .5 imperial tons. Im thinking ill cut some more wood, jack up the back of the car, and block the wheels higher.
Then get the longest reach i can on the hoist. position it so its right infront of the car, and hope that my engine will be able to move forward enough inbetween the legs of the hoist to clear the bumper.
Pics
I was hoping to try and keep the oil cooler, injector solenoid and the coolant resevoir bolted to the car, but found that i'd need a couple inches of clearance that they would free up. So out they came.

I bought this 3200lb sling for 25 bucks. Made maneuvering the engine around a bit easier because its so long. I also plan to use it on the bumper. chains would be a bit harsh

I found this was going to be a problem, the shift arm was going to make dropping the engine a bit tougher, so i just removed it (1 bolt).

And then took a look at the sugar cube to see how worn it was.... pretty worn for 65k km - even started to wear the shift arm pin down.

Here is how we blocked up the engine once we cleared the mounts. We started to lower the engine - this caused the tranny side to dip - which we needed. Because this allowed it to clear its mount, then drop below the chassis. Then we could push the engine to the tranny side to clear the timing belt side mount. then we continued lowering.
With both mounts clear, we were able to shift the engine to the right again to make room to lift the A/C pump up out of the way, we then tied it up to the ABS.


So, 20 hours up to last night. spread over 4 nights. So i think i could do this again in 2 solid days np.
Now to try and get the engine out from under the car
I was hoping to try and keep the oil cooler, injector solenoid and the coolant resevoir bolted to the car, but found that i'd need a couple inches of clearance that they would free up. So out they came.
I bought this 3200lb sling for 25 bucks. Made maneuvering the engine around a bit easier because its so long. I also plan to use it on the bumper. chains would be a bit harsh
I found this was going to be a problem, the shift arm was going to make dropping the engine a bit tougher, so i just removed it (1 bolt).
And then took a look at the sugar cube to see how worn it was.... pretty worn for 65k km - even started to wear the shift arm pin down.
Here is how we blocked up the engine once we cleared the mounts. We started to lower the engine - this caused the tranny side to dip - which we needed. Because this allowed it to clear its mount, then drop below the chassis. Then we could push the engine to the tranny side to clear the timing belt side mount. then we continued lowering.
With both mounts clear, we were able to shift the engine to the right again to make room to lift the A/C pump up out of the way, we then tied it up to the ABS.
So, 20 hours up to last night. spread over 4 nights. So i think i could do this again in 2 solid days np.
Now to try and get the engine out from under the car
darthripley
Moderator
dude you should've gotten one of those mover's dollies at harbor frieght for like $20 instead of fighting all the wood.
the dolly looks like a square and you just need a little wood on the dolly to keep it level & you just roll it out from under the car.
the one we got will support 1000 or 1500lbs.
either that or just get some casters at the hardware store that are rated at so many pounds each and take the wood and make a square & drill the casters 1 into each corner.
Thats my plan. problem is the legs of the hoist get in the way. at the hoist current reach, they completely surround the motor.
I think the hoist can lift the car at the .5 Ton setting. its lost ~700 pounds of weight i figure.
that should provide enough reach to allow me to push the engine forward inbetween the legs of the hoist.
Will have to see lol
Thanks
I think the hoist can lift the car at the .5 Ton setting. its lost ~700 pounds of weight i figure.
that should provide enough reach to allow me to push the engine forward inbetween the legs of the hoist.
Will have to see lol
Thanks
Its out !!!!
I was going to wait for Ben to come over, but i was impatient and just went ahead with it.
Ill post pics in a bit.
I put another block under each rear wheel, which raised the back of the car another 1.5".
I only had enough room infront of my car to put the boom at 1 ton, which was probably for the best anyway.
I then used cargo straps to secure the hoist to the big wooden bench against the wall. Then just started hoisting the car up from the bumper.
I used the egyptian method of rolling my engine out lol (figure if they can move a massive stone block, it can move my engine) - just like i set up last night, with the rollers - then started pulling the engine out. Up hill by the way, my garage has an incline so water will drain out.
Was really easy. When one bar came to the back of the plywood, id tilt the motor forward, remove it, tilt it back, and place it at the front again, and continued pushing.
It just barely fit inbetween the legs of my lift, once the car was lowered back down, there was only 2 inches of clearance to the bumper.
I then attached the hoist back up to the engine at the 2 ton mark (shortest boom), undid the cargo strap on the hoist, and turned the whole thing 90*.
So now its hanging by the hoist infront of my car. Ben should be here soon, and well take the tranny off, and find a place to set the motor down.
Cheers
Corey
Thanks
Okay, Night # 5, total time ~26 hours
Ben and I managed to remove the tranny... holy shit... not looking forward to getting that on.
It basically came down to him yarding the crap out of it while wiggling it out.
Then we got most of the exhaust manifold-downpipe off. all the Manifold studs came out of the head probably for the best, they were pretty rusty.
Then we removed the clutch and flywheel. we used his Mazda flywheel holder which just so happened to fit the teeth of our flywheel, and wedge onto one of the pins on the block.
Ill get some pics of it. Maybe we could get Speedsource or Ko racing to make one for us that bolts to proper holes? it would make removing the flywheel and crank pulley a piece of cake.
Once the flywheel was off, i took a good look at the rear main seal. And noticed it was kindof wet near the bottom.... leaking perhaps? ill post pics later.
My Throwout bearing is completely nackered.
I also noticed the seam where the head gasket is along the back of the engine is a bit wet. so im thinking that could be leaking also?
Which means ill probably break down and get a MHG, and ARP studs.
Is it even possible for a bad HG to leak oil, or does it simply blow?
Im also thinking about deleting my A/C. i want to keep it, but hate dealing with it, and the weight.
Ill post lots of pics tomorrow.
Cheers
corey
Okay, Night # 5, total time ~26 hours
Ben and I managed to remove the tranny... holy shit... not looking forward to getting that on.
It basically came down to him yarding the crap out of it while wiggling it out.
Then we got most of the exhaust manifold-downpipe off. all the Manifold studs came out of the head
probably for the best, they were pretty rusty.Then we removed the clutch and flywheel. we used his Mazda flywheel holder which just so happened to fit the teeth of our flywheel, and wedge onto one of the pins on the block.
Ill get some pics of it. Maybe we could get Speedsource or Ko racing to make one for us that bolts to proper holes? it would make removing the flywheel and crank pulley a piece of cake.
Once the flywheel was off, i took a good look at the rear main seal. And noticed it was kindof wet near the bottom.... leaking perhaps? ill post pics later.
My Throwout bearing is completely nackered.
I also noticed the seam where the head gasket is along the back of the engine is a bit wet. so im thinking that could be leaking also?
Which means ill probably break down and get a MHG, and ARP studs.
Is it even possible for a bad HG to leak oil, or does it simply blow?
Im also thinking about deleting my A/C. i want to keep it, but hate dealing with it, and the weight.
Ill post lots of pics tomorrow.
Cheers
corey
Pics:


Not much clearance once the car came back down - that was close lol. If i had parked my car a few inches forward, id be stuck :S


Tranny off - I think we fought with this for about 40 minutes - once all the bolts were removed.
There are 8 bolts on the bell housing i believe. then a few small ones holding the lower inspection plate on under the engine. - once this is off, you can see the lower half of the flywheel.
Then there are the tranny to engine mounts along the back on the transfer case.
The BGB suggests to pull the tranny out 2-3 inches, so to clear the input shaft off the clutch. Then rotate the tranny to the right and pull some more to clear the transfer case out from behind the block.
Well, we got the first inch or so, then the weight of the tranny started to get taken up by the input shaft. At this point, all the metal alignment pins for the tranny-block were cleared, and I held the engine, while Ben pretty well went Hulk on the thing and ripped it off lol - so much for pulling 3 inches and and rotating.

Clutch and flywheel off. We used his nifty Mazda flywheel holder made by an rx7 tuner company. It just so happened to slide onto one of the block alignment pins, and wedge into the flywheel teeth. It wasn't perfect, but it did the trick at removing the flywheel bolts.
Here it is on Ben's rotary


Wet rear main seal... could it be leaking? good thing I'm replacing it.


Disk thickness - 65k km

Now, tonight we'll be removing the rest of the exhaust manifold/downpipe/turbo. and we'll try to get the crank pulley off somehow. we tried the flywheel holder, but because we ghetto'd it on there, it kept popping off under torque.
Oh, and any opinions on this ? Back of engine, Head to Block seam at Headgasket.

Thanks
Corey
Not much clearance once the car came back down - that was close lol. If i had parked my car a few inches forward, id be stuck :S
Tranny off - I think we fought with this for about 40 minutes - once all the bolts were removed.
There are 8 bolts on the bell housing i believe. then a few small ones holding the lower inspection plate on under the engine. - once this is off, you can see the lower half of the flywheel.
Then there are the tranny to engine mounts along the back on the transfer case.
The BGB suggests to pull the tranny out 2-3 inches, so to clear the input shaft off the clutch. Then rotate the tranny to the right and pull some more to clear the transfer case out from behind the block.
Well, we got the first inch or so, then the weight of the tranny started to get taken up by the input shaft. At this point, all the metal alignment pins for the tranny-block were cleared, and I held the engine, while Ben pretty well went Hulk on the thing and ripped it off lol - so much for pulling 3 inches and and rotating.
Clutch and flywheel off. We used his nifty Mazda flywheel holder made by an rx7 tuner company. It just so happened to slide onto one of the block alignment pins, and wedge into the flywheel teeth. It wasn't perfect, but it did the trick at removing the flywheel bolts.
Here it is on Ben's rotary
Wet rear main seal... could it be leaking? good thing I'm replacing it.
Disk thickness - 65k km
Now, tonight we'll be removing the rest of the exhaust manifold/downpipe/turbo. and we'll try to get the crank pulley off somehow. we tried the flywheel holder, but because we ghetto'd it on there, it kept popping off under torque.
Oh, and any opinions on this ? Back of engine, Head to Block seam at Headgasket.
Thanks
Corey
Night 7 ~ 30 hours
Removed the turbo-mainfold-cat tonight. Will be replacing all the studs and nuts.
The motor's getting smaller
Next im going to tackle the head. Ill remove it and check the gasket. I've decided to replace it with a metal TTE 1.2 mm, with ARP studs.
Might as well, its only a couple more bolts away
Corey
EDIT: Just removed the intake manifold. Im starting to find lots of brittle hoses.
Total Time, ~33 Hours