You are using an out of date browser. It may not display this or other websites correctly.
You should upgrade or use an alternative browser.
You should upgrade or use an alternative browser.
how to adjust the MAF on st185?
- Thread starter EvilStig
- Start date
underscore
Well-known member
One of the other forums, I want to say 6gc, has a thread on how to read the markings on the MAF and set the adjustment screw back to stock. I have it saved on my other computer, I'll try to find it and post it.
underscore
Well-known member
Found it! http://www.6gc.net/forums/index.php?showtopic=59570
In case the link dies
In case the link dies
One common problem people run into with their 3sgte AFM's is that their idle screw had been messed with at one point or another, and the BGB doesn't have any clear instructions on how to set it back to its factory position. This post will show you how put it back to its original adjustment.
Remove the AFM from your car, and take a look at the section circled in red. It's a little difficult to see (you might have to bust out the carb cleaner), but there is a 2 digit number stamped into the casing. This number is a code that represents the distance from the top of the screw, to the top edge of the whole the screw is recessed in.
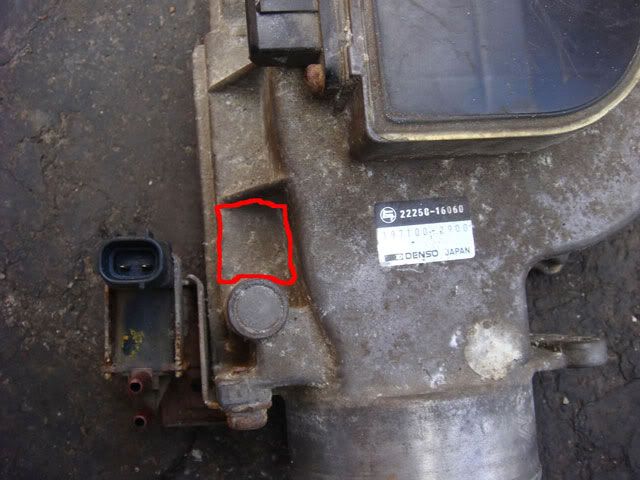
Once you get your two digit number, your going to have to refer to this chart to convert the code to millimeters. Keep in mind, that ever AFM has its unique number.
25 = 12.5mm
30 = 13.0mm
35 = 13.5mm
40 = 14.0mm
45 = 14.5mm
50 = 15.0mm
55 = 15.5mm
60 = 16.0mm
65 = 16.5mm
If your code is higher or lower then this chart, then just add/subtract using this chart as an example.
Now that you have your code figured out, your going to need a wooden match (or something similar), a pen, and some kind of digital caliper or micrometer. Set the digital caliper as close as you can to your mm measurement and mark that length on the wooden match with a pen.
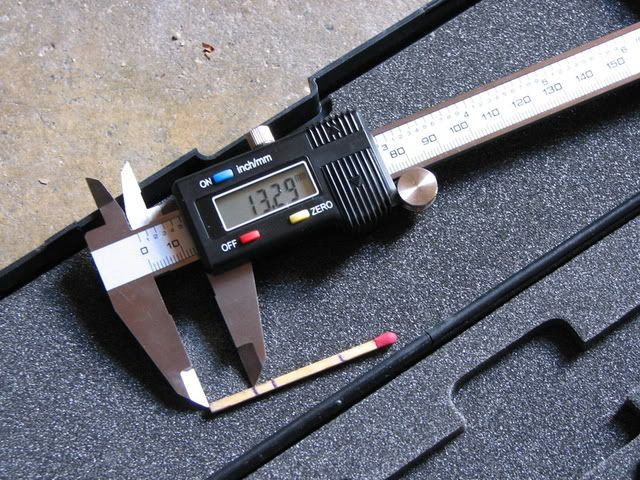
Now stick the match down into the AFM so that its touching the very tip of the Philips adjustment screw and adjust the screw as needed so that the marking on your match meets the very top edge of the recessed hole the adjustment screw sits in. Now RESET YOUR ECU by pulling the efi fuse or disconnecting the battery for about 30sec. Reinstall the afm and start the car back up, your AFM is now back to its factory position.
Special note:
1. The factory position of the screw has been found to play a part of cold weather hesitation that the 3sgte tends to have. If you experience this problem, and are brave, you might try changing its position. See this thread for more info....
http://mr2oc.com/showthread.php?t=287627
2. If you have a metal cap over your screw (like the one in the first picture) then your afm bypass screw has never been adjusted, and this doesn't apply to you.
93celicaconv
Member
We have (2) ST185's - I'm storing one in my garage this winter. I looked to find that stamped number mentioned here in the location stated. My AFM is as clean as a whistle, and the cap is still intact. But there is no stamped number anywhere in the vicinity of where the marking is on the pictures provided above. Does anyone else have a 2-digit number stamped in that area?
underscore
Well-known member
I checked my spare RC MAF and it has a small 59 stamped there. It's very faint so maybe if yours was cleaned at some point it got ground off?
93celicaconv
Member
Its also an aluminum housing, which has a tendency to surface corrode to a "dust-like" substance. So perhaps 30 years has worn just enough off to not being able to see the stamping any further. Not sure.
So your "59" means 15.9mm inset of the top of the screw below the top of the housing the screw resides in?
So your "59" means 15.9mm inset of the top of the screw below the top of the housing the screw resides in?
underscore
Well-known member
It looks like it, both of mine are missing the cap but I'll measure them and see where they're at.