OKC Project-8/1/15-Another fun car!

l0ch0w

New member
MWP":3tozqn4l said:
Im sorry, but :doh: at the mil-spec harnesses bit.

You shouldn't be telling people you make mil-spec looms because you dont.
Your looms do look good, but they are far from mil-spec.

You are right, the Deutsch connectors are not technically mil-spec and neither are the methods of construction, but I do have the capability of making harnesses to mil-spec specifications. I guess by that logic, we should really stop calling the CT20-b by that name too... And if you wanted to get technical every connector that is designed to plug into things like injectors and coils do disqualify the harness from meeting mil-spec. The wire coverings as well need to meet mil-spec which would require silicone coated fiberglass tubing in places. If you truly wanted your harness built to mil-spec (at least for the firewall disconnect and wire material) I could do it, but it would be very very expensive.

I have the turret heads for Soriau, ITT Cannon, and Amphenol D38999 connectors if you wanted to front the money for those connections. But frankly the Deutsch ones accomplish the job, and do it well enough that I have full confidence that there wouldn't be much you could do to them that would compromise your wiring.

The harness I am building for my personal car is using Raychem DR-25 as the wire covering... Which does meet AMS-DTL-23053/16. My wiring is all either shielded kapton wiring, or 19strand silver tefzel. Im familiar with how to concentrically twist and lace wires and how to use strain reducing loops, and how to completely environmentally seal the harness... but for our application, this is excessive and time consuming and would make things too expensive..
 

toayoztan

Moderator
That cloth wrapping is pretty damn nice, I'm liking it...for the interior anyway. Although, I'm not sure about using that in the engine bay, but I can worry about that later.

Thanks for the ideas everyone, keep them coming if you can think of more things. I'll have to get with a few of you regarding harness wrapping in the next couple of weeks.

So, I pulled my interior harness out (the one behind the dash), laid it out, studied what to take out for the AC.

Well, as I started teasing away what was AC/HVAC, I realized I am probably going to need some confirmation and some help.

If I rip out all of the A/C, well...I have no functional HVAC system (meaning, the blower, heater, etc, won't really work, it seems).

So I am going to tease out the entire harness from the main harness, then modify it so I have only the required wiring for making everything work still but w/o any A/C function, sensors, etc.

This way, I can be sure I didn't miss any wires, I can leave out what I don't need, and I will be rewrapping the harness separately as an HVAC harness.

I don't believe any celica came without AC so it probably won't be possible to find any wiring diagram to help me out, and even then, it'd probably have different units/motors/controls/etc. that I'd have to source it.

This doesn't seem to be a HUGE undertaking after studying the diagram for a bit, but I want to be sure I am not leaving anything out that won't allow my stuff to function properly. Basically, I just need the blower to work, motors to work to control where the air actually goes, and for the heater to work, along with rear defrost, that's it.

I will post a pic of the AC wiring diagram I pulled from the BGB (I copied and pasted the pics together as one picture, since it covers like 5 pages). If someone wants to help me on this, I believe it'll be a good guide to serve the rest of us who want to pull the AC harness out in the future, and know which wires to keep, what to rewire, etc.

Any takers?

http://imageshack.us/photo/my-images/54 ... agram.jpg/

I've got a higher quality version available to send for those interested in helping.

Bryan
 

l0ch0w

New member
I couldnt burn the stuff with my heat gun... so I know it tolerates heat quite well...

Heres what the catalog says on the stuff:

2:1 Fabric Heatshrink
Fabric heatshrink tubing, a unique mixture of polyolefin and polyester yarns, is the ideal way to form the only shrinkable fabric of its kind. The woven construction makes this product extremely flexible and resistant to trapping water, heat and humidity. Provides outstanding abrasion, chafing and cutthrough protection, even at high temperatures.

Shrinkflex fabric tubing is designed primarily to provide mechanical abrasion protection for components such as rubber hoses, plastic pipes, and harness.

Also,

As for pulling your A/C harness, Ive had to do some extensive work with the A/C system in my car. If its figuring out what you can rip out I can help you out there :) ive had to completely diagram out the A/C wiring so that I could convert my A/C amplifier to work with my standalone...
 

toayoztan

Moderator
Andrew, great. I will probably get with you this weekend once I finally get the entire HVAC wires separated from the harness. Then I can lay it out and figure out what I can take away and wrap up the rest.

Thanks!

Bryan
 

MWP

New member
The fabric covers are great for flexibility, but they have the big downside of being porous.
Water, oils, fuels soak in, and dust also gets trapped in it.

Not so bad on a show or weekend car, but not brilliant for a daily driver.
I know it would be a big problem for me as ill be hitting dirt roads quite often :(

I need to look into flexible heatshrink more, ie: http://www.wirecare.com/Heat-Shrink.asp
 

l0ch0w

New member
DR-25 is about the only thing you can use in terms of automotive heat shrink thats going to stand the test of time tbh...

Remember, the factory harness is in no way hermetically sealed.. have you ever seen the underneath side of your fusebox??? One theory is that you should allow it to breath freely as to allow humidity and moisture the opportunity evaporate rather than stagnate inside the wire housing... Either you hermetically seal your harness completely from the elements (which is very very expensive) or you allow it to breathe...

That and the flexibility of the wiring has more to do with how the wire is arranged inside the heat-shrink vs what kind you use...

For good flexibility in a harness you have to concentrically twist the wire and add strain loops before the connector... Like this:

circulartwist.jpg


I've torn apart my fair share of harnesses, and by far the biggest failure point on our engine harnesses is where heat from the exhaust manifold has damaged the insulators on the O2 sensor wiring, Alternator wiring, and A/C wiring... Once the insulators are damaged to that point, the moisture trapped in the harness wrap and heat cycling begin to degrade the conductors. For the most part everything else is left relatively unscathed...
 

Fox 21 Alpha

New member
I wouldn't get too wrapped up in the milspec requirements, after being in a HMMWV with an electrical fire, the "self extinguishing" part isn't all its cracked up to be lol. Can't complain too much though, it was contained long enough to get out and hit the flame with a extinguisher and save the truck.
 

l0ch0w

New member
Were HMMWVs built to aviation mil-spec? I always thought their wiring was similar to any other vehicle's since they were made by GM. I know they have some ITT Cannon connections, but most of the other stuff was just regular automotive primary wire wasnt it?
 

Fox 21 Alpha

New member
Couldn't tell you, I'd assume our military vehicles would be built with whatever "mil-spec" requirements were out at the time (it was somewhat new, atleast by Army standards lol), but then again that'd be using logic, and thats a no-no in the military.
 

toayoztan

Moderator
Pics soon to come!

But just thought I'd drop by and say I've removed the harness for the ABS inside and engine bay (it's a TON of wiring).

I also removed the cruise control in the interior (the engine bay harness is part of the Engine Harness) with the speed sensor ECU. It thinned things out a bit too. I've removed the Cruise actuator years ago, and hardly use cruise in any car unless going across state (which doesn't happen in my alltrac, much). I need to remove the column switch/controls to clean it up there too.

Next, I'll be removing the clutch safety switch (A - Don't care for it or need it, B - I never park in gear, and C - I had an alarm that has remote start, but unsure if I'll put the same alarm back in...it was a bit fancy and had a bunch of wiring, including turbo timer, aux functions, etc...not really looking for that. I'd like an alarm that armed/disarm and remote started.). There's just one switch (at the clutch pedal) and a relay at the passenger junction box.

Only thing then will be to remove the rest of the AC. I kind of did this the hard way. I completely teased away the entire HVAC harness first. Probably would be easier to just start at the "ends" where the sensors/relays/etc. are, and just go backwards. However, I now know what I can remove for sure I believe, what to keep, and I'll be wrapping it as a separate harness in case I mess up - it isn't as wasy to "delete" as the ABS and cruise since a bit of the wiring is still needed to control the fan motors, switches, etc.

With hardly anything going to the engine bay now, I'll probably relocate the big relay box in the engine bay near the battery. Just unsure where to relocate it. I want easy access and if that isn't possible, I'm not going to sacrifice access for cosmetic tucking.

Since I'll have an EMS, I'll also be removing wires for the injector and fuel pump resistor pack, and whatever else I can find.

I'll try my best to post up "how to" remove all of these harnesses, but damn, it is a bit of work to even show that step by step. I'll post pics that show the main gist of things...and diagrams showing you what to remove and what you must not remove JUST because the diagram shows it - like stop switch, parking brake stuff, combo meter wire, etc. Otherwise, it's as easy as starting at the sensor/relay or any ECU that's available, and just tracing the wires and de-pinning them from the plugs. Also, might want to consider and just unwrap the entire harness up front instead of doing it as you go. It'll make the job easier and faster and more efficicent.

This is NOT an easy task, and I don't recommend it to anyone unless you plan to almost completely remove your dash and anything under/behind it. And you need to be comfortable with wiring. I'm not genius at electrical nor am I an electrial engineer, so I spent a bit of time reading up the wiring manual and studying the wiring diagrams making damn sure I knew what I was removing.

Bryan
 

toayoztan

Moderator
Pics, b/c I know most of us like seeing that than readin posts :p

This is not an official How To, but briefly what I have done. I will try and make a proper How To on ABS, AC, Cruise Control, and Clutch Safety Switch removal later when I get more time over the next few weeks.

Here is where the ABS is located.
dsc6614edit.jpg


Passenger side removed.
dsc6621edit.jpg


Center section removed.
dsc6641edit.jpg


Driver side with most of harness removed.
dsc6675edit.jpg


This is what you'll mainly end up with when ABS is removed. The only wires going across the center is for speaker and door sensor.
dsc6676edit.jpg


That's a lot of wires for ABS!
dsc6690edit.jpg


Removed the entire dash harness to get to the rest of the ABS (only few wires), and start on AC and cruise.
dsc6723edit.jpg


Here's all the ABS components - ABS unit ("brick"), 4 speed sensors, ECU, and Accel unit (located above rear driver speaker).
dsc7000edit.jpg


Speed Control ECU (for cruise control) with its harness removed from the dash harness.
dsc7026edit.jpg


All that's left is the A/C and clutch safety switch!

Bryan
 

phattyduck

New member
I suddenly feel so lazy for leaving all the auto trans wiring in the car when I did the auto->manual swap. :doh:

Its amazing how much extra goes into the car for 'creature comfort' and safety stuff...

Awesome work!

-Charlie
 

darthripley

Moderator
I feel super lazy for just pulling the ABS ECU & not the interior portion of the wiring as well.
Once we tear into the car again I'll be looking forward to your How-To on it Bryan so we can ditch all the extra wiring that is unnecessary.
Great work on it!
 

jonstew

New member
It's just my 2 cents but I would keep the A/C wiring in the car and make it so you can add the A/C back in at a later date; times and your attitude on it will change as you get older (well mine did and getting a little fatter didn't help). It's nice showing up at meets in the summer and all these guys that stripped their A/C out to save 60 pounds are sweating like crazy and looking at my All-Trac with envious eyes because the A/C still works. Once again just my two cents on the subject. Great build / restoration by the way.
 

MWP

New member
Interior of the car & wiring looks soo clean.
Wish mine was like that, would make it far easier to work on.
 

l0ch0w

New member
Seeing you pull your dash wiring harness is inspring me to do the same... But im definitely keeping the A/C... Ive had to drive a car without AC for like 3 years now... it sucks, I also LOOOVE cruise control. So thats not going either.
 

toayoztan

Moderator
Thanks everyone!

Jon, I'd love to keep the AC too, but I had the mechanical components ripped out 3 years go or so. The lines are pretty beat up. Realistically, if I were to have AC in an alltrac, I will probably end up getting another alltrac for track/street use and keep AC with it. That way, one will be dedicated for drag, another for track/street use.

Also though, when I rip out the AC wiring, I am going to keep the wiring and actually wrap it up into its own harness and throw it in the box with the other stuff, that way it can be hooked back up if I do change my mind.

I posted an AC deletion thread in Club Chat, so if anyone can help out with that, thanks!

Bryan
 

toayoztan

Moderator
Alright, an update.

I'll try to keep the text short, and show you pictures instead.

Got done separating the cruise control, ABS, AC, and neutral/clutch safety switch from both the engine bay and behind the dash. AC components were already ripped out years ago, so I already know how much it sucks without it. But I survive and we don't get a genuine winter of snow and ice here in Oklahoma, so there's plenty of opportunity to drive in Fall and Spring especially. More than likely, I'll get another alltrac and keep AC and use it for track use (maybe a 205 by that time??).

I must say, it was definitely a challenge to do all this wiring removal, but in the end, I am happy with this decision. I learned quite a bit about the wiring of our car, locations of things and improved my skills on reading wiring diagrams and manuals.

So, after getting everything together the first time, including the dash, I ripped it all apart again to do this mini project. Now, the pics below show I got it back together again (i'm a pro by now lol), along with the rear speakers back in like before. Next, I'm putting the 'empty' blower part back in w/o the evap core, then the carpet, and rest of the interior panels and seats.

Then the put the rest of the door back together, along with radio, etc.

Pretty soon, I will probably hook up what I need to, in order to get the battery online and have the car powered so I can test out various stuff like the windows, door locks, and sunroof especially (god I hope I put that together right...). I washed my car after throwing in the sunroof, no leaks, so that's a good sign.

Enjoy!

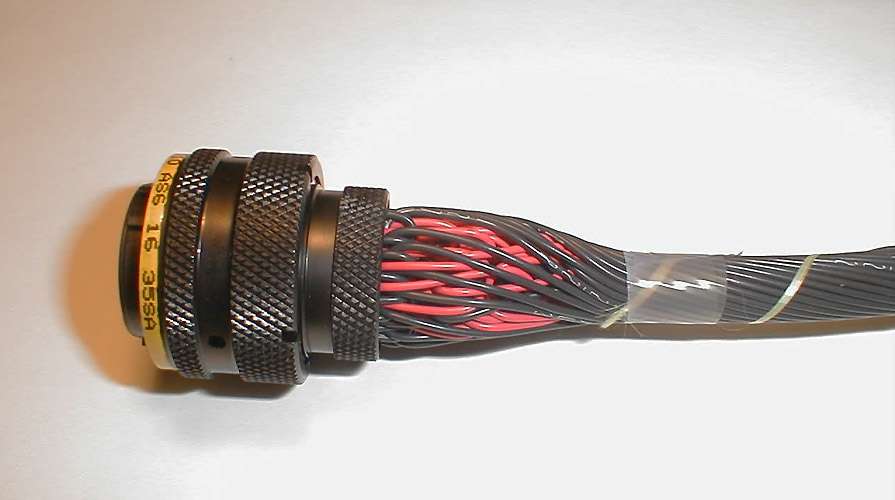
Mesh loom and roundit 2000 loom. I used mesh at first...hated it. It wasn't feasible for me at the time to depin everything to get the heat shrink and mesh loom strung through, not to mention it frays so damn easily at the ends. Even using a hot knife/wire to make the cuts, you still have to expand the ends which ends up to fray still. So I went with roundit 2000, split loom. It's awesome. It's rated near 400 deg. F, abrasive/chemical resistant, etc. VERY flexible to work with, and curls in on itself up to 180 degrees at least. Secured it with some 3M Super 33+ electrical tape, and I am good to go (for the interior at least). I may switch things up once I get into the exterior, and redo my engine bay harness that runs along the front, and my AEM wiring harness.
dsc7311edit.jpg


Here's the AC wiring separated out, including the fuse box (the horn and fuel pump relay remain attached to the harness of course), AC Amplifier which is found underneath the evap core area (you need to leave the AC Auto Amplifier and AC System Amplifier intact). I am 99% confident what I have removed is what is needed to still have a functioning AC. I double checked 50x and had a few others look at the diagram.
dsc7427edit.jpg


New OEM-type windshield.
dsc7125edit.jpg


Here's how the interior currently sits. You can see the wiring and dash is back in.
dsc7433edit.jpg


This shows the wires running across the front of the rear passenger seats. If you remember, this was a huge harness b/c of the ABS. Now, it's just 3 wires - 1 for the door sensor, 2 for the rear speaker.
dsc7436edit.jpg


Polk Audio speakers installed. I had to shave down part of the plastic on the box that was sticking above the surface. Wasn't too bad with a wheel grinder. Crossover is screwed in place above the box, where the ABS ecu would have been.
dsc7441edit.jpg


Rear tweeter for the component.
dsc7442edit.jpg


Here, TWM short shifter installed with SpeedSource shifter base bushings onto a wet black powder coated base assy. Also, you can see the roundit 2000 loom going across for the mirror controls and ebrake sensor. The speed control unit for the cruise control is also gone, which sits under the radio.
dsc7459edit.jpg


Here, you can see the speaker box showing what's in the rear. Mmm...Stance suspension, Tremec transmission, and various other goodies for the LS1 you see - we are going to put this into my bro's 240z that you saw earlier, if you remember.
dsc7474edit.jpg


Bryan
 
Top